Author Topic: Rob's Bandit Trans Am  (Read 4392 times)

Rob

  • Filthy Ho
  • *
  • Posts: 2515
    • View Profile
Rob's Bandit Trans Am
« on: October 28, 2012, 04:42:09 pm »
Thought it was about time I started my own thread about the 77 I found last year.


Although progress has been slow it has been pretty steady.  I never planned for it to be a quick restoration.


Rob

  • Filthy Ho
  • *
  • Posts: 2515
    • View Profile
Rob's Bandit Trans Am
« Reply #1 on: October 28, 2012, 04:54:32 pm »
Strip down began in earnest with the primary intention of just finding out how much work was ahead of me.

The usual places on second gen have gone but not too bad.  The spats were removed to reveal the extent of the front of the rear quarters. After some rotary wire brush work it would appear that only the bottoms rusted out and not spread upwards as we all know they can.  


Drivers not too bad...


Passenger a little worse than drivers.....


My big problem though was unsurprisingly...The cowl panel.  Sorry no pics of that.

Rob

  • Filthy Ho
  • *
  • Posts: 2515
    • View Profile
Rob's Bandit Trans Am
« Reply #2 on: October 28, 2012, 05:07:26 pm »
Undeneath, again was not too bad.  Small bit of welding required on passenger rear rail and some on the bottom of the tail panel.

The fuel tank however was a little worse for wear.....


As this is not at the top of my priorities, I chose to attempt a repair with Fuel resistant Metal Set.  Seems to be OK, but still may look to renew the tank.


Fully rust treated and ready for some underseal.

Rob

  • Filthy Ho
  • *
  • Posts: 2515
    • View Profile
Rob's Bandit Trans Am
« Reply #3 on: October 28, 2012, 05:12:20 pm »
Like I said. The underneath was all good.  Whole underbody has now been cleaned back and treated.  Am currently on the process of applying an additional coat of primer before the underseal.

Bits that I can't get at will be done as each component is removed for repair or renewal.

Entire front end stripped off including bonnet, wings, inner wings etc etc, to allow access to the firewall and cowl panel.

Rob

  • Filthy Ho
  • *
  • Posts: 2515
    • View Profile
Rob's Bandit Trans Am
« Reply #4 on: October 28, 2012, 05:20:50 pm »
Screen virtually fell out as the sealant had perished during its 17 years entombment....Is that even a word????

Cowl panel and associated previous bodged repair cut out and dressed ready for new panel.

Having not welded anything for some time, I was a little hesitant.  Soon got back in the saddle and was really patient with the refit.  Turned out really well and have just today had the new screen fitted.


So thats where I am....Still trying to find out more history on the car.

Note to self: Must take lots more pics.

Andy

  • Guest
Rob's Bandit Trans Am
« Reply #5 on: October 28, 2012, 06:30:14 pm »
Looking good!

Are you going for a straight up resto, or resto-mod adding a few things about the place?

Hows the paint?

Rob

  • Filthy Ho
  • *
  • Posts: 2515
    • View Profile
Rob's Bandit Trans Am
« Reply #6 on: October 28, 2012, 07:37:05 pm »
Paints pretty good, apart from the obvious bits around the corrosion.

My intention is as stock as possible.

art b

  • Pro Pimp
  • *
  • Posts: 8917
    • View Profile
Rob's Bandit Trans Am
« Reply #7 on: October 29, 2012, 09:30:50 am »
good work rob ...
This forum needs, ''YOU'' posting,Not just reading ! :moon:

Roadkill

  • Guest
Rob's Bandit Trans Am
« Reply #8 on: October 29, 2012, 12:35:21 pm »
Quoting: art b
good work rob ...


Keep us updated.

Cunning Plan

  • Mega Ho
  • *
  • Posts: 5452
    • View Profile
Rob's Bandit Trans Am
« Reply #9 on: October 30, 2012, 08:13:02 pm »
Ooooh another project to read about

1968 VW T2 Bay Bus (currently being restored and upgraded)
1999 Jeep Cherokee XJ (modern classic daily driver)

Rob

  • Filthy Ho
  • *
  • Posts: 2515
    • View Profile
Rob's Bandit Trans Am
« Reply #10 on: December 19, 2012, 09:06:20 am »
Quoting: Rob
So thats where I am....Still trying to find out more history on the car.


OK.  So after  getting original dealer sheet from Pontiac Historical Society as I am unable to find the Build sheet in the car.  It appears that the car is a Y82 Special Edition.


Problem is, the Y82 package included T-Tops, which this car does not have.  The cars were all built hard top then where necessary were shipped to Fisher to have the roofs cut out.

Posted on a US forum to try and get some feedback on this as it doesn't appear to have had a new roof unless it was a really good job.  Was suggested on there that I may have a ringer.  One guy advised to check the hidden VIN behind the AC box on the firewall.Didn't know that was there.

Well, you'll be happy to know that the VIN matches. So it is an all numbers matching car.and not a ringerBut I am no further with finding out what happened to the T-Tops.  Thats if they were ever fitted.....

Rob

  • Filthy Ho
  • *
  • Posts: 2515
    • View Profile
Rob's Bandit Trans Am
« Reply #11 on: July 17, 2013, 08:32:24 pm »
Rear End Repairs.....

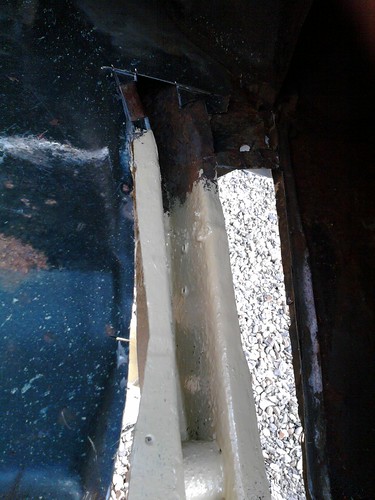
With the bumper and cover out the way the true horror of the back end showed itself.....


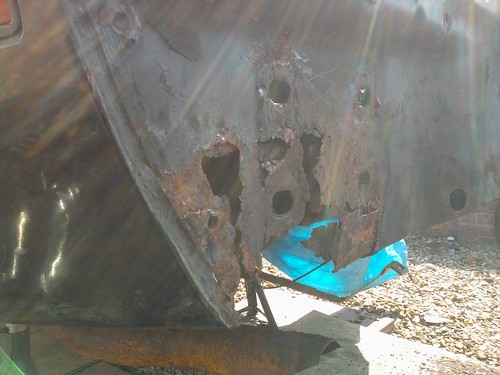
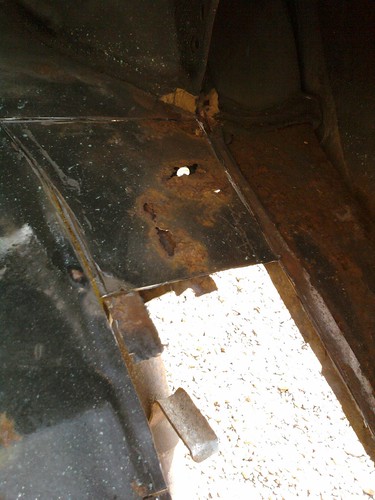
Drivers Side wasn't too bad but Passenger side had rotted though to the frame rail end.  

The fun of sourcing replacement parts began.....

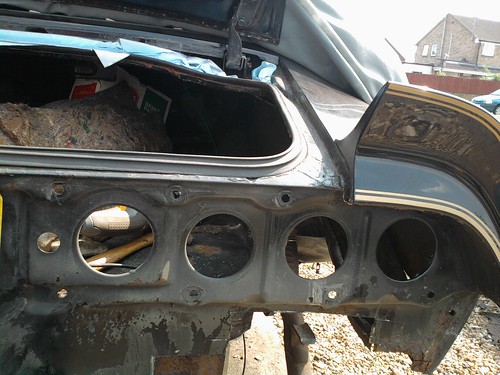
The Tail Panel (Inner and Outer): I have cut out the bad bits and as they are quite simple, will be fabricated.  
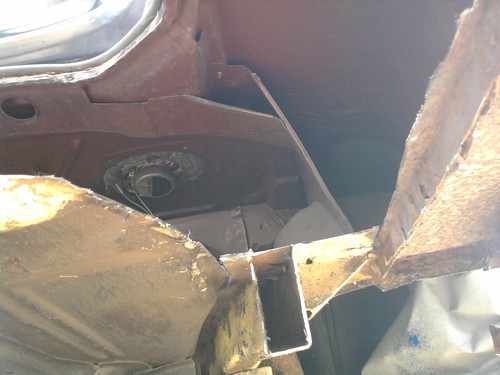
The Frame Rail (Passenger Side):  As I have a rotten section at the front I originally intended replacing the entire rail, only to find out that they are not available as a replacement part (only the rear two thirds are currently available), so I set about attempting to find a good used one.  Managed to source one from across the pond and the seller suggested cutting the sections out that I need as the entire rail is 62 inches long and shipping would be very high.....A little more work maybe but the saving would be useful.  They subsequently arrived so cutting could begin...

With a little corrosion in the trunk floor to tackle at the same time...Leaf springs dropped for overhaul as well


Replacement frame rail "Z" cut to add a little more strength and the successfully welded into position.


May still sleeve the inside for added strength due to it being close to rear shackle point for Leaf Spring.

Just Panels to Fab now....

Roadkill

  • Guest
Rob's Bandit Trans Am
« Reply #12 on: July 17, 2013, 09:03:05 pm »
Amazing what lurks just below the surface.  

What's the beige stuff you're coating the repairs in ?

Rob

  • Filthy Ho
  • *
  • Posts: 2515
    • View Profile
Rob's Bandit Trans Am
« Reply #13 on: July 17, 2013, 09:12:30 pm »
Anti Corrosion undercoat.  Meant for trains (SHHH...!)

All surfaces are getting a coat of Rust Inhibitor followed by a coat of this stuff then either undersealed or painted black.

Andy

  • Guest
Rob's Bandit Trans Am
« Reply #14 on: July 18, 2013, 07:57:59 am »
Really good work! Gonna enjoy watching this build take place!

art b

  • Pro Pimp
  • *
  • Posts: 8917
    • View Profile
Rob's Bandit Trans Am
« Reply #15 on: July 18, 2013, 09:14:40 am »
good work there rob...

at least the steel thats there, looks nice and thick to weld to ..
This forum needs, ''YOU'' posting,Not just reading ! :moon: