Bit of an update, new bearing arrived, I had suspected the outside pinion bearing and race of being shot from the initial uninstall and fighting against it to remove it. Rather than risk anything though I decided to change both bearings and races, this does mean that any patterns from before won't be the same as the inner pinion bearing will also change the depth that the gear is in the case.
Just to give an idea in case people are scratching their heads about how this all works...
Pinion PreloadWhenever checking the pinion depth or backlash or even running a gear contact pattern, the first thing to ensure is that the pinion gear is actually under a load and not 'free spinning' in the bearings. This is to replicate the effect that the crush sleeve will have on the bearings on the final install. As the crush sleeve is a once only use item, it isn't used until the final install once all the other items are checked over.
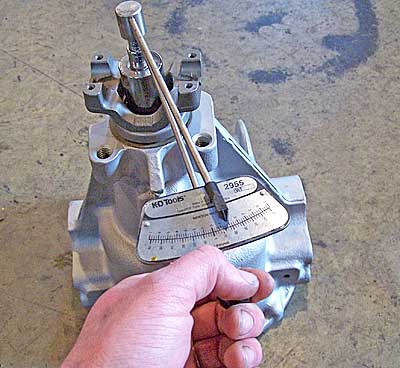
The preload is determined by how tight the pinion nut is and how much pressure the yoke is forcing on the back of the outer pinion bearing. The preload is measured in INCH pounds and it is the rotational force not the initial break away force required to make the pinion rotate.
On the final assembly of the axle, this preload needs to be achieved but with the crush sleeve used between the outer bearing and a location on the pinion gear shaft. The crush sleeve ensures that there is always a preload there and that there can't be any movement towards the ring gear of the pinion gear, unless the nut comes off.
 Pinion Depth
The pinion has to angular opposed bearings on it, one main big one called the inner (sits right behind the pinion gear) and has the depth controlling shim between it and the back of the gear. The outer is at the opposite end and it pressed on from behind by the yoke.

The depth control is important to the gear setup, as too deep engagement (thicker pinion shim being used) risks the possibility of the gears binding under extreme load. Too higher a contact (thinner or no shim being used) risks tooth breakage from the load being focused on the edge of the tooth.
BacklashBacklash is the physical movement between the pinion and ring gear. This is controlled both by the pinion depth shim but largely also by the carrier preload shims either side of the carrier between the casing and carrier bearings.

These shims adjust the location of the carrier in the casing, moving it towards the pinion (adding shims to the ring side and removing them from the other side) decreasing backlash and increases the engagement. Moving the ring away (removing shims on the ring side and adding on the other) will increase the backlash seen between the ring and pinion.
Whenever removing shims from one side, you must add the same number to the other. This maintains the carrier preload on the bearings. For all these test installs the carrier has been a 'snug fit' in the casing. When it comes to the final install and the shims are installed for good, it is always a good idea to have it tight as possible, with the last shims being tapped in with a brass hammer.

Checking the backlash is done with a Dial Test Indicator on the outer most edge of a tooth, while holding the pinion gear and rocking the ring back and forth.
Gear Contact PatternsSo once you have done all of the above it is now time to finally mark up about 4 - 5 teeth on the ring gear with the yellow gear marking compound. This stuff is great for being able to see what contact the gears are actually having when then mesh. From the patterns you can get an idea of what adjustments to your setup are required.
It is crucial to have a decent or acceptable pattern, as there will be no fun when the first time you hit it and the ring gear teeth say adios, this is the most time consuming, but also rewarding stage of the build, as you actually get to see what all the stages above achieve. The hardest part is understanding what changes to the above (Pinion Depth, Backlash) will do the contact pattern you see.

The diagram above is a good way to understand it, but they are very much 'in a perfect world' adjustments. As I found with mine, I had the drive side move all over the shop while the coast pattern seemed to say pretty centralised. This can throw you off when it comes to adjusting the next gear run.
This video however explains it a lot better than diagrams like that.


