Author Topic: '79 Camaro - Major surgery  (Read 31822 times)

Rob

  • Filthy Ho
  • *
  • Posts: 2515
    • View Profile
Re: '79 Camaro - Major surgery
« Reply #150 on: June 16, 2015, 07:03:01 pm »
Moving further round, onto the trunk drop off, things didn't go so well.  The front edge didn't take much encouragement to seperate at all, and revealed the trunk drop off was in a pretty poor state.  This wasn't at all visible until the outer panel was removed.

Currently in the process of getting rid of my Trunk drop offs and just continuing the trunk corners right to the outer panel.  Seems to be the norm to do this to get rid of the water trap.

Jamieg285

  • Pimp
  • *
  • Posts: 7356
    • View Profile
    • http://www.mfatw.com/WD
Re: '79 Camaro - Major surgery
« Reply #151 on: June 17, 2015, 11:04:12 am »
Currently in the process of getting rid of my Trunk drop offs and just continuing the trunk corners right to the outer panel.  Seems to be the norm to do this to get rid of the water trap.

Sounds interesting.  Any pics and/or links to more info?

Rob

  • Filthy Ho
  • *
  • Posts: 2515
    • View Profile
Re: '79 Camaro - Major surgery
« Reply #152 on: June 18, 2015, 07:25:46 pm »
This is not mine but this is similar to what I am doing.  I have not kicked the panel up in the middle.  Mine is pretty flat right across.

https://www.flickr.com/photos/62906096@N02/18745706589/in/dateposted-public/

Jamieg285

  • Pimp
  • *
  • Posts: 7356
    • View Profile
    • http://www.mfatw.com/WD
Re: '79 Camaro - Major surgery
« Reply #153 on: June 19, 2015, 12:08:43 pm »
Not sure I see the benefit in that. Seems like a lot of work.

I thought the water that ended up there came from the rear window leaking/spray from the rear wheels.

Jamieg285

  • Pimp
  • *
  • Posts: 7356
    • View Profile
    • http://www.mfatw.com/WD
Re: '79 Camaro - Major surgery
« Reply #154 on: July 13, 2015, 01:04:22 pm »
I'm getting sloppy with my updates, it's been nearly a month since the last one, and there been a few changes and a number of work sessions since then.  So much so, I'm struggling to remember all the updates.

First up, I managed to find a buyer for the wheel adapters, so thay have gone.  I have also sold both quarter skins.  A strange decision as I have only just got one of them in from the US and haven't fixed the quarters on the car yet.  I was able to make a small profit on them though, and have found something better.  I don't have the funds/luck to find original NOS full quarters, or the new reproduction ones that people are talking about, but I did find a company that sells a skin that is larger than the common ones, and extends up to the window and trunk edge, rather than stopping part way up.  A pair of these, as well as a new tail panel and trunk drop offs is on it's way, along with a few brake bits.

On the car itself, I've been continuing with the driver torque box. Bit by bit I've cut out the old one.


Eventually it was out:


So far, I've just loosely cleaned up the inside of the rail, chipping of any loose rust.  The tip of the rail is in pretty poor shape, but this is where the SFC is, and there is plenty of overlap, so I'm not too concerned.

A quick trial fit of the new box


Next I started preparing the box for fitting, drilling spot welds.  There was also a spot where the stamped hole for the mounting clip was completely wrong, and needed extending.


Whilst the area is open, I've started preparing the floor patches.  There's a bit of section in the rear panel that goes up to the trunk that needs fixing.  I was initially looking at doing this all from a new piece of metal, but there was a few inches of this section attached to the donor floor section, so I am going to use that for part of it and fill in the middle part.


I sliced the donor floor patch a bit wider than the gap and adujsted to get it fitting loosely in the right place.  I needed this to help get the alignment of all of the patches correct, as getting one in wrong would affect the fit of the rest.


Still quite a bit of fettling to do here, but it does feel like I am making good progress again.

In the coming sessions, I need to open up the panel above the frame rail so that I can get in an clean/treat it, along with treating the aleady exposed section, then apply some epoxy primer to that and the new panels.  I want to finish preparing the patches first though, so I can do all the primering at once.

Jamieg285

  • Pimp
  • *
  • Posts: 7356
    • View Profile
    • http://www.mfatw.com/WD
Re: '79 Camaro - Major surgery
« Reply #155 on: July 23, 2015, 12:45:03 pm »
The kids school holidays have started now, so I have a few weeks where I don't have to go and collect them when I get home from work, meaning I have some extra time available for the car. 

I had just over an hour to spare yesterday, and I decided to do something constructive and fitted the patch to the inner rocker.

After cleaning up all the edges, it was clamped into place.


Had a few wire feed problems on the welder, so it wasn't pretty, but then this will be hidden by the outer panel anyway.  Thankfully I was able to sort the feed issue and it did start welding nicely again.


Finally, for today at least, I ground back the inner face, as this is where the floor patch will attach.


A few days ago I had a few spare minutes, so applied some rust treatment to the inner frame rail.  Looking much better now and ready for a coating of epoxy primer.


Got plenty of things close to needing epoxy primer now, so I'll be digging the paint brushes out next week.

Roadkill

  • Guest
Re: '79 Camaro - Major surgery
« Reply #156 on: July 23, 2015, 03:14:43 pm »
What rust treatment were/are you using ?

Jamieg285

  • Pimp
  • *
  • Posts: 7356
    • View Profile
    • http://www.mfatw.com/WD
Re: '79 Camaro - Major surgery
« Reply #157 on: July 23, 2015, 03:18:35 pm »
Kurust. Don't know if it's the best thing to use,but it's what I had in the garage.

Roadkill

  • Guest
Re: '79 Camaro - Major surgery
« Reply #158 on: July 23, 2015, 03:32:34 pm »
I used that on the Camaro - no issues 3 years later . . . .

Jamieg285

  • Pimp
  • *
  • Posts: 7356
    • View Profile
    • http://www.mfatw.com/WD
Re: '79 Camaro - Major surgery
« Reply #159 on: July 24, 2015, 11:29:53 am »
I used it when I did the rear window repairs a few years ago, and there are some bubbles appearing now.  That said, I wouldn't say I was particularly knowledgable on what I was doing back then and made tons of mistakes.  It's likely that the rust coming through now was on the untreated inner side, or perhaps through the very thin spray paint (read no other protection).

Planning to do a much better job this time.

Roadkill

  • Guest
Re: '79 Camaro - Major surgery
« Reply #160 on: July 24, 2015, 04:50:43 pm »
I used a POR15 spray-on product that worked (or seemed to work) pretty well . . . can't remember the name, now, though.

Jamieg285

  • Pimp
  • *
  • Posts: 7356
    • View Profile
    • http://www.mfatw.com/WD
Re: '79 Camaro - Major surgery
« Reply #161 on: July 30, 2015, 10:29:21 am »
With the family away on holiday, I've been able to get stuck in, and had a couple of good sessions on the car.

I'd spotted a 'doh' moment a while ago, noticing that the new torque boxes didn't have the parking brake cable brackets on them.  Thankfully, although I have recently got rid of a pile of scrap, I did retain the old torque boxes, so have the originals still available to recycle. Not looking too pretty, but they will have to do.


For small brackets, they put up a pretty good fight, but they did come off relatively straight in the end.


To counter the realisation of the mistake, a chance glance at the donor frame rail provided a positive find.  Where I had previously started making a small patch to fit at the behind the rear seat where it joins the inner quarter, I realised that the old rail had this section of panel still attached and in decent condition.  It's a perfect match to the part of the panel that was attached to the rear floor pan patch.  This will save me a lot of work, as it proved really tricky to get the complex bends right when I did the other side. Here are the two parts.


I wanted to start applyint some primer and get stuff put in place, so I spent the next part of the day preparing the frame rail, torque box and inner rocker ready for priming, cleaning and scuffing as necessary.  I also drilled a number of holes in the inner rocker where I will weld in the rocker and floor pans. Primer was then applied, with the small amount of the mix that was left going onto the underside/back seat panels (will have to get a pic of that later, as I missed it)


Before the primer was applied to the inner rocker, part of the prep included trial fitting the outer rocker.  This one is an AMD piece, with noticeable differences to the one used the other side (brand unknown) It seemed to be a better fit, and only needed a minor tweek at the front edge, where the triangle piece was fouling on the lower body.  Holes were drilled for the spot welds along the lower edge and tape carefully applied around the areas to be welded, only for me to realise it would be in the way when scuffing the EDP.


More good session updates to follow soon....

Jamieg285

  • Pimp
  • *
  • Posts: 7356
    • View Profile
    • http://www.mfatw.com/WD
Re: '79 Camaro - Major surgery
« Reply #162 on: July 31, 2015, 01:10:43 pm »
Another couple of long days on the car, getting full afernoon/evenings in.

First off, as promised, the missing picture showing the start of the primer going onto the back of the rear seat panels. Can't go any lower yet as the floor needs cleaning first (keep putting this one off)


Onto the first days work...  With the primer on the rail and torque box now dry, the two pieces were prepped, cleaning the areas to be welded and weld-through primer applied. Then it was out with the welder and start hitting it.  It went in really well, the welds being better than the other side - I must be improving as I go!


A lot of the rest of the day was spent sanding and cleaning up parts for primer.  The one slightly intersting bit was starting to make a side patch for the floor patch.


I was hoping to weld it on, but the pan needed some rust treatment first, so it will have to wait until later.


So, by the end of the day, primer had been applied to the inside of the outer rocker, the seat back patches, the topside of the torque box, and to finish up the pot, some on the trunk floor/rail section.


Next day...  Things are going well in the rear floor pan area, but there is another piece of the jigsaw that needs to be included before it can all be welded together, and that is the inner quarter panel.

The original plan was to do similar to the passenger side and replace the lower six inches or so, however the lower edge wasn't in that good a condition and really showed up when hit with the wire brush.


This changed the plan to doing a much bigger patch, and using the full lower edge. (I will revisit the passenger side later and see if the same area needs doing there too).

So, it was out with the drills and carefully finding and cutting out the spot welds.  My technique has advanced now, where I drill a 1.5-2mm hole in the centre to use as a guide, rather than just a centre punch. This is proving to provide a much more positive guide, resulting in quicker cuts and less broken cutters.  Downside is it's easy to break such small drill bits, but I think these will be cheaper to replace.


Didn't take long before things were starting to separate, and quite cleanly too.


With the panel seperated from shock tower and trunk floor, I moved to the front section to separate it from the outer rocker. After wire brushing the area, the spot welds were just about visible as colour differences in the metal.


A quick check up the inside of the panel also confirmed how far up the panel I needed to go.


These were quickly despatched and I was ready to start cutting.


That certainly improves the cabin ventilation!

With the bad section cut out in one piece, I was able to use it as a template for cutting from the new panel.


It isn't too far out, but will no doubt take lots of fettling to get right.


So, as with the 2 previous days, I finished off the day mixing and applying another pot of primer, finishing off the seat back patches, outer rocker, and first side of the newly cut inner quater.


That's it for this run of decent sessions, back to short stints for a while.  It's been a good few days, with some decent progress made and a positive feeling for once.

Jamieg285

  • Pimp
  • *
  • Posts: 7356
    • View Profile
    • http://www.mfatw.com/WD
Re: '79 Camaro - Major surgery
« Reply #163 on: August 05, 2015, 12:47:14 pm »
With the kids off school and at their grandparents during the day, I'm getting more time to myself in the late afternoons.  Weather permitting, I'll be able to get more done in the next few weeks.

Over the last couple of days I've done a bit more on the rear corner.  The fabbed up side piece for the floor pan patch has been attached:


The rear few inches were left hanging at this point, as the edge of the pan had been a bit mangled during removal and I wanted to make sure the new profile matched that of the inner quarter, before I did the final welding.

I've put two screws into the inner quarter, one from the cab going into the outer wheelhouse and then one from the outside going into the seat back (seen in pic below).  This gives me the panel alignment I needed to do some final trimming.  As always, I've gone a bit wrong and am left with a wide gap in a few places, but overall it's not too bad.


I need to primer the other side of this panel before I start welding it in. There's not enough area on it to use up all of the paint from a single mix, so I will have to do some prep work elsewhere so that I can use up the pot at the same time.  I figure I can extend the prep on the body side where the inner quarter will be welded out a bit, so will be able to coat the inner wheelhouse, maybe some of the outer too, but also some of the seat back.


Jamieg285

  • Pimp
  • *
  • Posts: 7356
    • View Profile
    • http://www.mfatw.com/WD
Re: '79 Camaro - Major surgery
« Reply #164 on: August 14, 2015, 12:44:25 pm »
Another couple of evenings work has resulted in some morale boost.  Putting some primer on things really can make a big difference to how the project looks, and as a result I will look at getting more stuff primered soon.

It started off because I had a couple of small items that needed to be primered, but I need more to be able to use up all the mix.  Not sure why I chose it, but I started digging into the passenger side inner wheelhouse, checking for the damage along the edges.  A bit of a blast with the wire brush on the angle grinder and I've found a few spots of rust/holes that need attention, but I think I can do it in two parts rather than one long one this time.


With most of the panel being OK, I decided to continue cleaning it up, and leave the repairs till later.  First up was grinding/cleaning up the welds from the patch put in last year. I started trying the flap disc for this too, and was impressed with the results and will definitely use it more.


I then used the wire brush to clean up all of the inner panel, readying it for primer.


I then repeated the exercise on the drivers side.  My hands were buzzing after that, definitely a job/tool to use in short stints.


I also cleaned up the edge of the seat back section, adding a small patch and then smoothing off.


Epoxy primer was then mixed and applied.  I'm really happy with the difference it has made to the inner arches.


The next evening I was able to continue preparing the drivers inner panel preperation.  First off setting it up and marking where the spot welds need to be.


These were then drilled and cleaned ready for the zinc primer.


The zinc primer has now been applied to the patch and the mating surfaces on the car, and it's all ready for welding, but I've stopped there for now.

I took a late decision to scrap the full outer wheelhouse on the drivers side.  There was going to be a lot of repair work required on the lower section where it meets the rocker (as already done on the other side), but also a lot of the lip is bad.  I'd recently read that the AMD piece is good quality, and also found a local hot rod shop that will get in individual pieces at decent prices.  With luck it will be here in a couple of weeks, about the same time as the big shippment coming in the container.

With the outer wheelhouse being removed, I didn't want to start welding around this area until all the new panels are available for lining up.  This means the next jobs will be another change of focus - but I haven't worked out what that will be yet.  Tail panel, floor pans or something else? 

Jamieg285

  • Pimp
  • *
  • Posts: 7356
    • View Profile
    • http://www.mfatw.com/WD
Re: '79 Camaro - Major surgery
« Reply #165 on: September 23, 2015, 12:59:37 pm »
Not a lot of progress lately, due to family holidays and birthdays.

Good news is the latest shimpment has arrived in the UK and been collected.  Pics will have to wait for another time, as they are all squirelled away in the garage, but good bits include:  100% quarter skins for both sides, trunk drop offs for both sides, outer wheel house (drivers),full tail panel, cowl panel, wheel adapters (with lip this time, yay!), and brake parts to allow fitting of the new system.  I really hope that is the last of the large orders.

As for movement on the car itself, I've been concentrating on the inner door jamb suppport on the drivers side.  Firstly cutting the bottom of the quarter up higher to give access, then making/re-using the template from the other side.  The rot has gone a bit further this side, but nothing to bad, maybe an inch bigger on the replacement piece.

The shape was then cut from flat sheet, and out with the hammers, resulting in this:


Next up will be some more primering.  I need to prepare this piece, which is next to be welded in, but at the same time I will put it on the outer wheel house, inner faces of the quarters, trunk drop offs and tail panel, so they are all ready to be fitted as soon as I am ready to fit them.

Jamieg285

  • Pimp
  • *
  • Posts: 7356
    • View Profile
    • http://www.mfatw.com/WD
Re: '79 Camaro - Major surgery
« Reply #166 on: September 30, 2015, 12:26:12 pm »
I had a half day to work on the car on Monday, so some time was spent on Sunday evening applying some primer to the next set of parts.  The inner brace was first on the list, with the outer wheelhouse and trunk dropp-off being next.


The next morning I made the final adjustments and then welded the inner support in.  I realise a missed a section at the bottom, where it attaches to the outer rocker, but that will be easy to sort out later.


With that done, it was on to cutting panels and spot welds.  I cut a large section of quarter panel out (less than will be required for later) to give me access to the outer wheel house.


I'd bought the outer wheel house as I thought it would save time replacing the whole, rather than trying to patch.  If I'd have realised how many spot welds there were, I may have reconsidered.  There are tons of them, about 1/2 in apart. Here are the first few.


An hour or so later and I've only just started to reach the top of the arch.  Access is getting harder due to the profile of the metal, and that the welds are nearer the curve.  Came up with the idea of cutting most of the panel out, leaving just the flange, which is far easier to access.


Another hour on, and I'm still only 3/4 of the way round.  Hopefully I will get this out in the next session.

Jamieg285

  • Pimp
  • *
  • Posts: 7356
    • View Profile
    • http://www.mfatw.com/WD
Re: '79 Camaro - Major surgery
« Reply #167 on: March 15, 2016, 01:49:54 pm »
Wow, more than 5 months since the last update.  The good news is I'm still here and so is the car.

Time has been pretty limited, and progress very slow and/or not particularly visible.

Following on from where I left off, the rest of the old outer wheel house was pulled off, and the new one offered up for trial fit.


By this time the weather and motivation was against me, and I didn't get any further with that area.   When the weather was good enough I did a bit of work on the drivers front floor pan.

First off was some exploratory work to determine how big the patch needed to be, and then a patch was cut from an offcut of the rear quarter.


I was then able to cut out the bad bits to match the patch.


The toe board area has previously been repaired (not by me) and there was some surface rust where the new patch overlapped the original metal. This needed cleaning up, as the patch I have made goes underneath this.


New patch trimmed and in place.


The patch has now been welded in, but not cleaned up yet. No pics yet, but I'll remember to take some.  All of this looks pretty short piece of work, but was done across about 5-6 weeks in short 30-45 minute stints.

That is almost it for on-car progress.

Time has been well spent in the meantime though.  I've spent many hours in the garage tidying up and re-locating things.  There were a few reasons for this:
 
1 - I had no room to move:


2 - I couldn't find anything. There were a few things that I had been looking for, but couldn't find (for obvious reasons). I've now been through about 90% of the stuff in there, re-organised and catalogued where things are to help in the future (when I finally get as far as rebuilding and move stuff OUT of the garage!)

3 - I need to make space for a compressor.  I'd managed to gather enough money over Christmas and birthday to afford a budget compressor that would be up to the job of spraying when the time comes.  It's not a small thing, so space had to be made and in the right place (not sure why, but all my sockets are on the same wall).  In preparation for this I have been making some cooling pipes from copper. I'm about halfway through this now, and aim to finish it soon.  Pics to follow...


Finally for now, I'd been mocking up the rear quarter panel to the outer wheel house to check compatibility.  The profile is good, but the lip is only folded about 45 degrees and will need bending in further to be able to weld the panels together. (pics would be really good here - need to get back on the game with those) I'm not keen in the idea of trying to hammer it down without distorting the panel, so I've looked at using a fender lip roller to do it.

This looks like it would do the job, with one big problem - the tool first to the rear end, which isn't fitted yet.  The plan therefore changed to getting the rear floor sections finished so that I could fit the the rear springs and get it all in place.  With this in mind I've started cleaning up the rear springs ready for a coat of epoxy.

However, whilst writing this I thought it will be easier to do the lip welding with the rear out, so it's got to go in and out a few times and not worth doing the paint work on it yet. Yet again, the plan changes...


The good news is that the weather is getting much better now, so there should be some more frequent updates.

Incursus

  • Blinged Up Pimp
  • *
  • Posts: 11797
    • View Profile
Re: '79 Camaro - Major surgery
« Reply #168 on: March 21, 2016, 12:44:48 pm »
Wow, more than 5 months since the last update.  The good news is I'm still here and so is the car.


:up:

Jamieg285

  • Pimp
  • *
  • Posts: 7356
    • View Profile
    • http://www.mfatw.com/WD
Re: '79 Camaro - Major surgery
« Reply #169 on: August 10, 2016, 03:56:23 pm »
Another 4 months with no updates!

Time on the car over this time has been very limited, often odd sessions of less than an hourm, once or twice a week.  It doesn't feel like much has been achieved, however a couple of longer sessions last week have meant I've been able to make a few bigger, more satisfying jobs.

I mentioned in the last update that a compressor was on it's way, so I spent quite a chunk of time building a pipe system to help remove the water vapour from the air. Not used it in anger painting yet, but it seems to have done the job.


When that was done, attention finally turned back to the car.  I welded in the drivers front floor patch.  I've didn't have the time or energy to grind the welds back, so for now I just gave it a quick spray to cover it until I do get to it.


Then it was the Drivers rear floor section. This was a bit of a jigsaw puzzle, requiring lots of welding to piece the bits together.  I wanted to get all of the sections joined and ready to be welded in, so that they could be epoxy primed before going in.  First job was to fill the missing spot, which I was able to extract from the original floor piece that came out when the torque box was cut out.


I mocked it up and tacked it in situ, to ensure it was at the right angle, then it was taken out and fully seam welded and cleaned up.


This and a few other parts were then epoxied ready for fitting.


The patches were then welded into place, cleaned and primed.  Photos don't show it, but I also welded the inner rocker into the floor edge too.


Next up was going to be the outer rocker panel, but when checking over fitment, I remembered that the lower fender mount point was rusted out and needed fixing.


Not sure what the hole on the left of the pic is for, but I made use of it to help line up the patch so that the threaded hole was in the same place.  I started with a cardboard template which recorded the location of both holes.  This was then transfered to the donor piece, and a suitable threaded block (taken from a scrap fender) was welded on.


A bolt was then threaded through this and into the one on the car, the open holes aligned, and then the car section marked for cuttting to match the patch.  Then some careful cutting with the dremel and the rust is out.


The patch is then tacked in at one end, again using the open hole for alignment. The patch is then trimmed to match the size of the cut hole, tapped up into place and finally welded in properly and cleaned up flush.


With that done relatively quickly, I was able to start looking at the outer rocker.  It has already been drilled and prepared for welding, but the car side hasn't.  I put it into place with screws, jacked it up into place and started to mark the areas that need cleaning up. 


Not sure what needs to be done in this area yet. 

I may need to replace some of the metal, but I don't have any decent reference on how this should attach if it were a complete panel. Not sure if I'm missing anything, and what bits should be welded to the rocker.  Guess I'll be doing some research...


Roadkill

  • Guest
Re: '79 Camaro - Major surgery
« Reply #170 on: August 18, 2016, 07:21:45 pm »
I spent quite a chunk of time building a pipe system to help remove the water vapour from the air

I bought 2 x £4 inline filters from eBay when I sprayed the Camaro . . . was recommended them by a painter.  That system looks impressive, though.  :P

Jamieg285

  • Pimp
  • *
  • Posts: 7356
    • View Profile
    • http://www.mfatw.com/WD
Re: '79 Camaro - Major surgery
« Reply #171 on: September 20, 2016, 11:12:58 am »
Did someone say progress? 

With some time off work I was finally able to put some reasonable hours into the car for the first time this year, and some good steps have now been made.

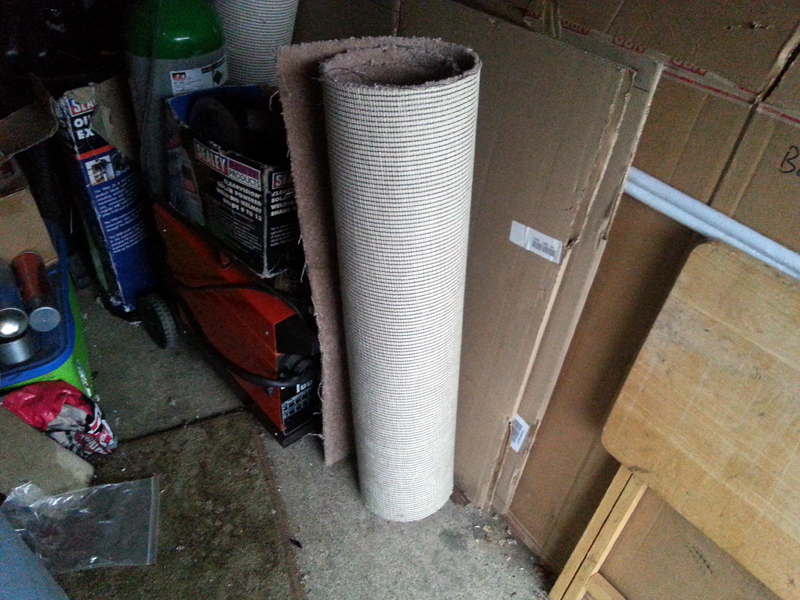
First off, and most important of all - I got a new piece of carpet!  I picked it up for pennies at a village fete, it's wide enough to fully cover the gravel area to the side of the car and was long enough to cut in half and give two pieces about as long as the main body section. Happy days!


Any way, back to the serious stuff, after a bit of fettling at the front section, I was able to get the drivers side rocker panel 95% welded in.  There's a couple of holes at the front door jamb where I need to get the door off before I can get to it, but the rest is done.  I've still got to grind the welds back and primer over them, but that will wait for another day.


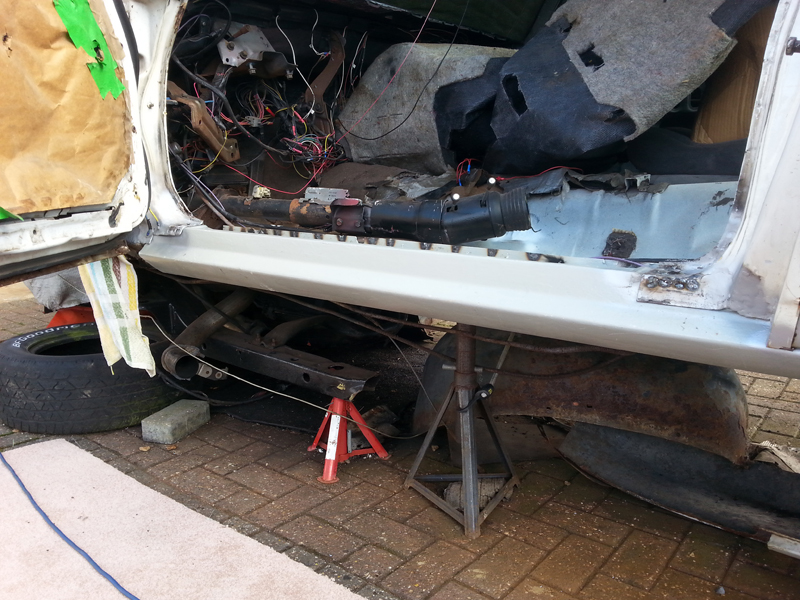
With that now in, I was able to focus on patching the inner wheelhouse panel.  After mocking it up in place I could see that the floor/underseat panel needed extending along the lip.


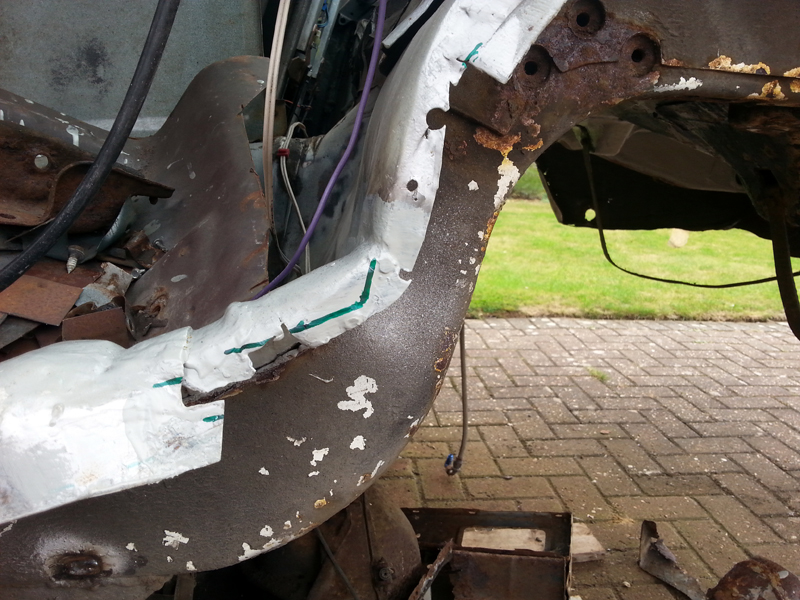
A rough shape was cut and offered up, tweaked and then welded in place.


That, along with the edges of both panels were then cleaned up and zinc primed ready for welding.  I used my butt weld clamps in anger for the first time, to ensure a nice even fit around the panel.


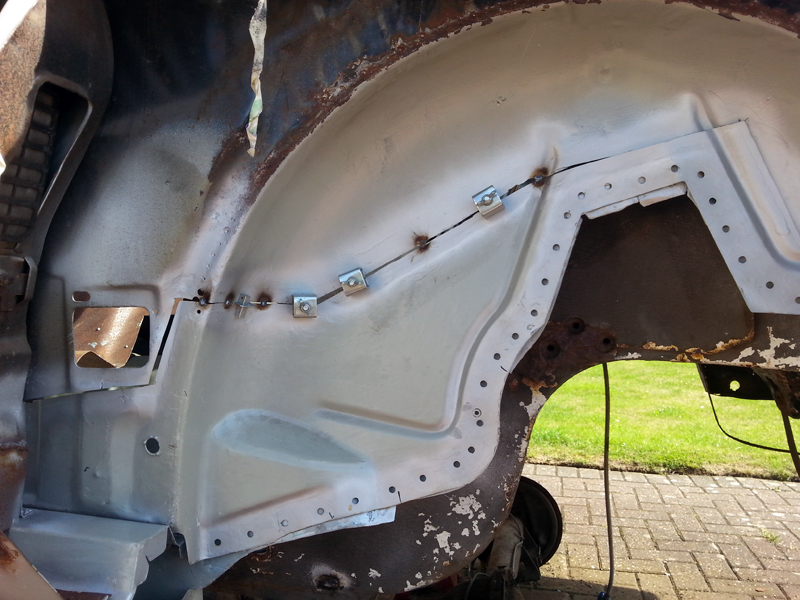
I tacked in between the clamps, then jumbed back and forth between them to extend the weld without warping (good practice for when I get to the Quarter panels).  Clamps were then removed and the rest of the runs completed.  With the panel join completed, I then filled in the spot welds along the lower perimeter.


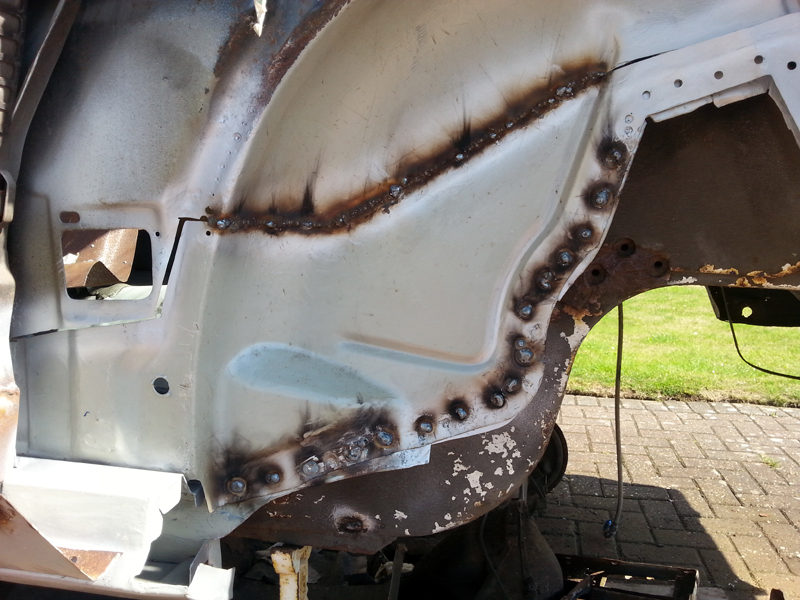
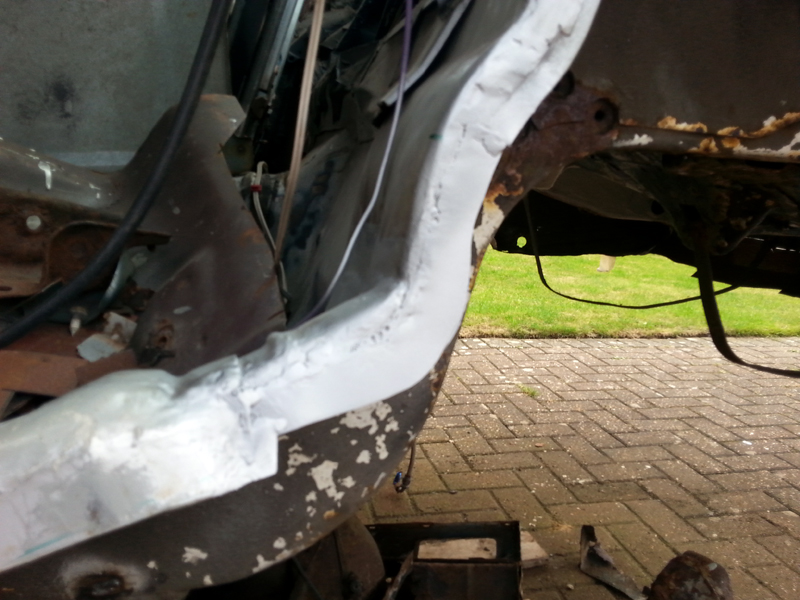
I didn't completed the full panel front to back though.  The front section needs to be welded from inside the car, and there was too much junk in the way, so that would be cleared later and welded another day. (still pending...) The rear section didn't quite fit where I'd cut (bad cutting) and will some metal removing from the car side, but there is also another section of the same panel that needs replacing, so I will do both of those at the same time. 

As with the rocker panel, the welds haven't been cleaned up yet, and I will wait until the rest of the welding is done and do them all at the same time.


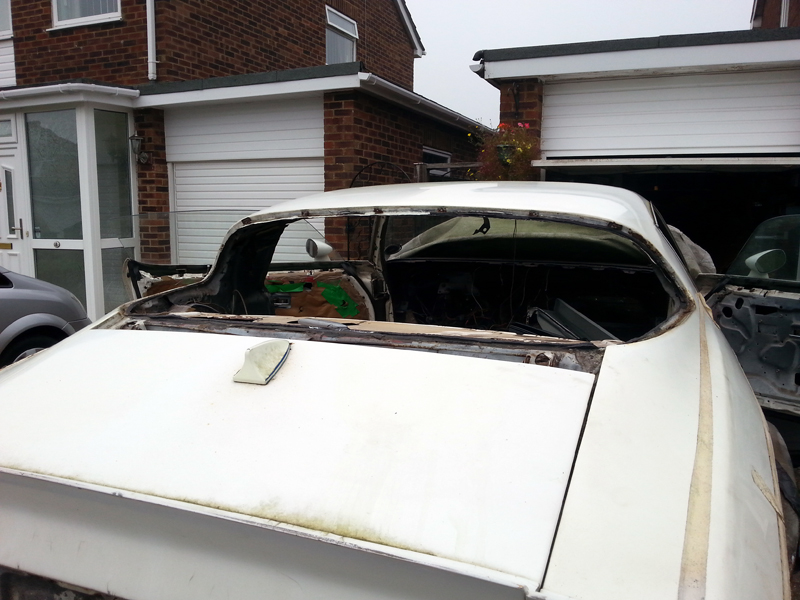
Before attacking the rearmost section of the inner wheel house, I wanted to know how much of the rear quarter I could safely remove and still be able to cover with the patch panel.  Offering up the panel as it was didn't help as it was being blocked by the door's chrome trim.  This was removed, after carefully extracting the weather seal first - It did split around one of the plastic clips, but I am hopeful it can be re-used.  I do have spares if it can't. 

With the chrome out of the way I tried again, but also, now the rear window glass was in the way.  Having taken the glass out a few years ago, I knew this wasn't going to be a quick job, but it was necessary, so I got on with it.  I'd already pulled the trim off, so the first task was to remove the filler panel.  Getting the screws out was simple, but gettting the panel out whilst the trunk lid was still attached proved more tricky. I'd got myself in a bit of a mess, having moved the panel but not enough to get it out, but too far to be able to fully open/close the trunk.  It took a fair bit of wiggling, but it did come out - note to self - remove the trunk lid next time.

With that out of the way, I discovered it was really easy to use a sharp knife along the lower edge from the outside.  Using a narrow blade I was able to get it right around the corner too, being able to bend it slightly as the angle changed.  That was half the job done with relative ease - it was now the more difficult upper section that had to be tackled from inside.


You may remember that the inside was still storing a lot of the interior pieces, including the seats.  This was all pulled out and given a quick clean up, before being re-located to a freshly vacated area in the loft.  With a relatively clear interior, I was able to clean it up a bit more, before climbing in to attack the window seal from the inside.  It was a lot tougher along the top and needed a heavier duty blade, as the thin one was bending too much for my liking.  Even so, it didn't take long at all. I was well chuffed at around 40 mins of cutting to get it fully out, about 10% of what it took last time!


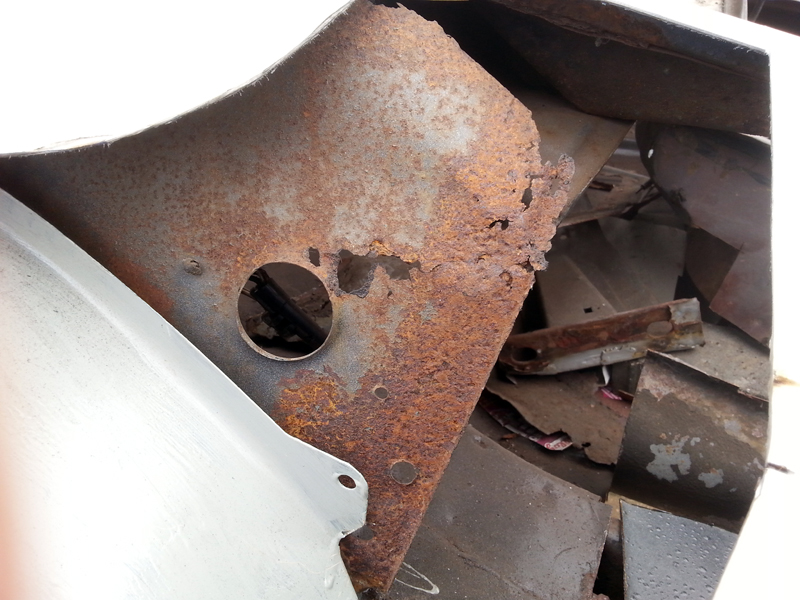
With the glass now out of the way, I was able to get a real check done on the size of the replacement skin.  I was pleased to find that it extended right up to and just past the trunk edge, confirming that I could take pretty much as much of the quarter out as I wanted.

Armed with this knowledge I cut out the section of quarter immediately around the section of inner wheelhouse that needed to be replaced.  I need to but a bit more, but have already got a much better view of what needs to be cut out.


More next time...

Roadkill

  • Guest
Re: '79 Camaro - Major surgery
« Reply #172 on: September 25, 2016, 01:27:55 pm »
I would be cacking it taking glass out.  I suspect I'll need to remove the screens from the Caddy but don't think I'll be brave enough to do it on my own.

:sofa:

Jamieg285

  • Pimp
  • *
  • Posts: 7356
    • View Profile
    • http://www.mfatw.com/WD
Re: '79 Camaro - Major surgery
« Reply #173 on: September 26, 2016, 11:47:19 am »
I think it helps that I know that the glass that I'm taking out isn't going to be re-used, and I have the replacement stored behind the shed. 

It's not that tricky though, just be very careful.

Jamieg285

  • Pimp
  • *
  • Posts: 7356
    • View Profile
    • http://www.mfatw.com/WD
Re: '79 Camaro - Major surgery
« Reply #174 on: November 15, 2016, 01:46:33 pm »
Time for another update, just to show I'm still here and working!

First up was the removal of the rusted section of the inner quarter.  This was the first opportunity I'd had to use the air hammer with chisel attachment. (You can also see my nice new carpet, which has a deep pile and is kind on the knees :-) )


All I can say is wow - I wish I had this when I started, it would have saved me hours of pounding away with a lump hammer.  I need to get used to using a bit, as it can be a litte over agressive, but will make a big difference going forward. Anyway, it took just a few seconds to cut away 5 spot welds to the inner support and the piece was out.


With that piece out of the way, I noted that it gave me good access to re-do the repair done to the trunk floor, many years ago when I was still working out which end of the welder to use.  To say it was ugly and poor is an understatement, and needed to be taken out.  I didn't get a 'before' picture, but here it is cut and primed ready to go.


When it was a case of weld it in, clean it up and apply some epoxy.


Before applying the epoxy, I took the chance to clean up the last lot of welding (to the inner wheel house) and some of the trunk support and frame rail and make good use of that batch of epoxy.


The final part of this installment was the insertion of the new part to replace what was cut out at the top of this post.
I carefully aligned it at the lower edge, where the arch is, to ensure the contour remained smooth across the pieces. A couple of butt weld clamps held it in place, and once tacked in, I was able to massage the upper parts to get them to line up as I needed.


When the seam was done, I was then able to clamp the piece onto the inner support and refill the spot welds.


I've ground down the welds on the lower part of the arch, as these will be visible behind the wheel.  The upper parts will be behind the outer wheelhouse, so I'm not going to worry about cleaning those up.  There is a section of welding that will be visible from inside the trunk, so I plan to clamber in there sometime to clean it up.  I'll need to do that before I apply any epoxy, so for now have just sprayed some cheap paint over it to protect the metal until I'm ready to sand it back of, clean it all up and epoxy both sides.

Before I do that, I plan to fix the trunk floor (where I'd cut some away to allow access to the frame rail) and make it whole again, so that it's secure enough to work inside when working on the arch.

The weather has well and trully turned now, and is a lot colder and frequently wet at the times when I'm available.  Work rate will have to slow, but I do want to keep plugging away at it.