Author Topic: '79 Camaro - Major surgery  (Read 31820 times)

Jamieg285

  • Pimp
  • *
  • Posts: 7356
    • View Profile
    • http://www.mfatw.com/WD
'79 Camaro - Major surgery
« Reply #25 on: February 21, 2014, 08:51:45 am »
Just a small update today.  I forgot to mention that I'd dug around the tool kit to find the spot weld cutter that I bought a couple of years ago (in preparation for this job)


I also went out and bought a decent spot weld chisel:


I had a short 45 mins to work on the car last night, so had a look at the front end in regard to removing the front wing. Removed the front headlight and the mounting bucket behind it (which I plan to clean up and repaint before re-assembly) to look for some of the 'hidden' bolts at the front of the wing.

I also removed the battery to get a good look at the main fender to fender extension joint, and spray some WD-40 at them. The inner fender is not in good condition, in fact I'm not even sure it's still in one piece.  


I forgot to take pictures, but I'll make a point of getting some before I go any further in this area.


Now, I've hardly got started on this yet, but already I've taken the decision to extend it into a bigger project.  

I won a partially restored front sub-frame on eBay for 99p a number of years ago and it's been stood in the garage ever since, waiting for the opportunity to be swapped in. It's not a small task to change - Remove everything from the front - bonnet, engine, wings, nose, suspension; cut out the SFCs and then re-assemble it all. As the car had been a daily driver, and required for ferrying kids about, the chance to do it never arrived.

Now though, a number of these jobs have to be done in order to do the work required for the MOT (remove bonnet, wing SFCs). Also until the car passes it's MOT, it's not like I'm taking it off the road to do it.  It just makes sense to do it now.   (There were other jobs that were considered, but had to be postponed due to lack of budget to get more panels).

While the front end is off, I am also going to tackle any repairs that need doing to the front core support. You can't but these new yet, and there's a restored one on eBay now, for a measly £400  It seems obvious that the best thing to do is repair my own whilst I have the chance to do it.


The biggest hurdle will be working out where to put all the gubbins while they are off.  I'm hoping to be able to clear a bit of space in the garage, but it's already overflowing.

Roadkill

  • Guest
'79 Camaro - Major surgery
« Reply #26 on: February 21, 2014, 12:33:00 pm »
Quoting: Jamieg285
I'm hoping to be able to clear a bit of space in the garage, but it's already overflowing.


You need a shed ! - Or two !!

Jamieg285

  • Pimp
  • *
  • Posts: 7356
    • View Profile
    • http://www.mfatw.com/WD
'79 Camaro - Major surgery
« Reply #27 on: February 21, 2014, 01:56:19 pm »
Quoting: Roadkill
You need a shed ! - Or two !!


Got a shed, but that's pretty full too. The last remaining space in there was taken up by the Corvette wheels I got at the end of last year.

It's not very weather proof either.

I think my first project should be a real good clearout

F Body

  • Trainee Gangsta
  • *
  • Posts: 15551
    • View Profile
'79 Camaro - Major surgery
« Reply #28 on: February 23, 2014, 10:22:43 am »
If I had your easy road access at the rear fence there would be a garage going there  

Jamieg285

  • Pimp
  • *
  • Posts: 7356
    • View Profile
    • http://www.mfatw.com/WD
'79 Camaro - Major surgery
« Reply #29 on: February 23, 2014, 10:57:52 am »
Here are the missing pictures from yesterday's update.

Headlight and mounting bucket removed


To reveal the hidden front bolts on the fender


The inner fender doesn't look healthy


And the core support will need some work

Jamieg285

  • Pimp
  • *
  • Posts: 7356
    • View Profile
    • http://www.mfatw.com/WD
'79 Camaro - Major surgery
« Reply #30 on: February 23, 2014, 11:13:43 am »
Most of yesterday was spent painting fence panels (just as well,as if was dry then but has been raining alk morning today)  This means they don't need to be stored in the garage and I can at least get in there to try and sort things out to make space.

Despite that, I did spend half hour on the car, removing a few more bits and trying to work out how to remove the nose.

Drivers side inne fender is even worse.  There may be an inch of joined metal,  but I doubt it


The rest of the front end bits out


A bit too rough trying to remove the wiring for the side light.


That might need a new headlight.

art b

  • Pro Pimp
  • *
  • Posts: 8917
    • View Profile
'79 Camaro - Major surgery
« Reply #31 on: February 23, 2014, 01:26:23 pm »
the can o worms is open
This forum needs, ''YOU'' posting,Not just reading ! :moon:

F Body

  • Trainee Gangsta
  • *
  • Posts: 15551
    • View Profile
'79 Camaro - Major surgery
« Reply #32 on: February 23, 2014, 02:49:15 pm »
Must be approaching the point where you have to decide if patch repairing is feasible

It's starting to look as if a complete strip down will be needed to sort the rot out

Sorry

Jamieg285

  • Pimp
  • *
  • Posts: 7356
    • View Profile
    • http://www.mfatw.com/WD
'79 Camaro - Major surgery
« Reply #33 on: February 24, 2014, 12:29:55 pm »
Quoting: art b
the can o worms is open


I don't think it's ever had a lid on it

Most of the things I've shown I've know about for a number of years, just not had the opportunity to resolve them.

Jamieg285

  • Pimp
  • *
  • Posts: 7356
    • View Profile
    • http://www.mfatw.com/WD
'79 Camaro - Major surgery
« Reply #34 on: February 24, 2014, 12:35:12 pm »
Quoting: F Body
Must be approaching the point where you have to decide if patch repairing is feasible


Well the passenger floor/sill area will be all new panels. Just got to work out how much, if any, of the original floor to retain, as from under the front seat back is all OK.  

Core support is a different matter. As there isn't a new replacement available, and I don't have £400 to buy a ready restored one, I'll have to repair it in patches myself.

Inner fenders will be replaced when funds allow. Had I known how cheap I could get them in through STS I would have done them earlier. For now I think I will weld/bolt in some gussets to hold it together.


Quoting: F Body
It's starting to look as if a complete strip down will be needed to sort the rot out


Yeah, I know.  I can't do the full strip down now, but I'm giving it a good go at the bits that don't need more money right now, and the rest will be done another time.  The important goal right now is to get it MOT'd and back on the road.

Jamieg285

  • Pimp
  • *
  • Posts: 7356
    • View Profile
    • http://www.mfatw.com/WD
'79 Camaro - Major surgery
« Reply #35 on: February 26, 2014, 12:25:46 pm »
Reference pictures dump.


Jamieg285

  • Pimp
  • *
  • Posts: 7356
    • View Profile
    • http://www.mfatw.com/WD
'79 Camaro - Major surgery
« Reply #36 on: March 03, 2014, 02:15:23 pm »
This weeks update...

Spent most of the available time this week tidying the garage to make room for removed parts (i.e. bonnet, wings). I surprised myself with just how much space I was able to reclaim, just by re-ordering stuff, although all spaces are now stuffed to the gills.  I really need to have a proper turn-out.

Anyway, following some research on body mounts, I figured it would be a good idea to give the replacement sub-frame a good check over before doing a loads of work removing the old one, just in case it was bent.   Fortunately the clear floor space was just wide enough to lay it down for measuring.


It all measured up OK, but I did spot that the rear most holes where the body mounts go are a bit mis-shaped, so these will need to be repaired. A couple of patch plates and a suitably size hole saw have been sourced.
I spent a few minutes adding an extra layer of Smoothrite to the upper side. In a couple of days when it's dry I'll flip it over and do the under side.


Whilst the paint was drying, I turned my attention to the car. Aim for the day was to remove most of the bits and bolts that would allow me to remove the nose in one piece, ready for when I have a helper to get it lifted off.  A number of these were hidden from view, but most came out with ease.   The trickier ones came when I'd worked out that the front spoiler spats were linked to the nose and fenders, so would need removing.

The passenger side was a complete pig. There are 4 bolts through the lower fender and bottom of the nose, and all 4 of them sheared There were 2 screws going up from underneath and one of these is seized solid with the head starting to round. Then there are 3 screws on the back edge, 2 of which were also seized, however the fender extension was so rotted that one has fallen out, and the other won't take much persuasion.


What did surprise me was that I managed to free both of the fender extension support braces, which have a reputation for being paper thin and breaking as soon as you look at them.

Moving to the drivers side, I was expecting more of the same. This time though, all 4 bolts undid OK (well one just pulled through the urethane nose, but that was because it was the wrong bolt and no washer). One screw came out OK, the other was already hanging where the metal had rusted away from the main panel.  I got the spat off OK, but the fender doesn't look too good.

The fender extensions look to be toast, but I'll give them a proper assessment later when they are off the car.  The pictures aren't really showing how bad they are.
Worst case is that they will need replacing, however I have got a pair of NOS that have been sitting in the loft for a number of years.

As usual, not enough time to make any decent steps, but at least it's moving.

Parts update, I've ordered a set of solid body mounts and rear spring mounting hardware.  The torque box plates have also been ordered.  Thinking ahead, I've also bought a new engine oil pan from RockAuto, to be put on whilst the engine is out. Hopefully it will cure some, if not all of the oil leaks.

Andy

  • Guest
'79 Camaro - Major surgery
« Reply #37 on: March 04, 2014, 03:18:27 pm »
Good work there fella! Looks like a bloody big job but I'm sure you'll crack it.

Jamieg285

  • Pimp
  • *
  • Posts: 7356
    • View Profile
    • http://www.mfatw.com/WD
'79 Camaro - Major surgery
« Reply #38 on: March 12, 2014, 01:07:11 pm »
Another weekend where I spent more time dealing with fence panels than the car

I did get a couple of hours though. I've removed the hood latch mechanism to try and make lifting the nose off a bit easier.  Had another go at trying to remove the battery tray, but still no luck. Have taken to spraying rust penetration oil on it regularly in the hope that it will help.

Quoting: Jamieg285
It all measured up OK, but I did spot that the rear most holes where the body mounts go are a bit mis-shaped, so these will need to be repaired. A couple of patch plates and a suitably size hole saw have been sourced.  


I forgot to take a picture of the original hole in-situ, so here's the remains after I cut it out:

 
As you can see it's not particularly round. It looks like the previous owner tried to repair it by welding directly onto the edge of the hole, easier to see on the underside.


Anyway, I cut the right sized hole in the new plate, lined it up over the old one and clamped, before cutting through both old and new together. I was then able to butt weld the patch in and grind it down.


After grinding I can see that there's a few spots that need going over again.  View from underneath shows that the penetration wasn't ideal all the way round, so I'll maybe attack it from underneath, or just re-cut and re-do the thin bits.


I'm hoping that there will be enough clearance for the mount bushing on that lower right corner. I think that is part of the original frame, so it should be OK.  Need to wait until the shipment comes in in April so I can trial fit it. That said, I hope to have the old frame off the car by then, so would be able to test fit the old bush.


I'm getting close to being ready to lift the nose off, and I'm hoping that I can manage it on my own. I suspect that I'll get it off OK, but may need help carrying it down the alley way without knocking it against the wall.

Jamieg285

  • Pimp
  • *
  • Posts: 7356
    • View Profile
    • http://www.mfatw.com/WD
'79 Camaro - Major surgery
« Reply #39 on: March 17, 2014, 01:57:13 pm »
I managed to get a good 5 hours on the car this weekend, and although I got a lot done, I can't say I've made much progress. I can say that the car now has less rust and has probably lost some weight as a consequence, thing is that rust isn't from where I was expecting it.

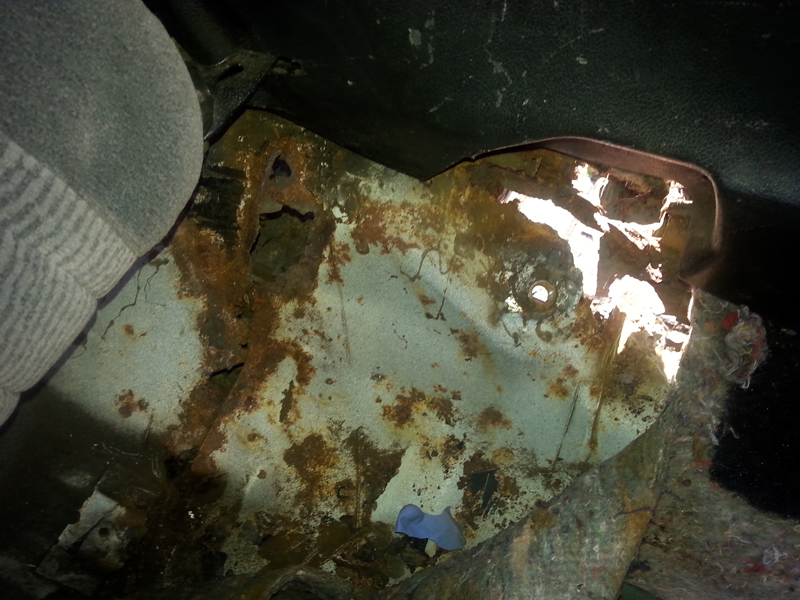
I started the day in the interior, stripping out the drivers side so that I could check the inner sill and inner quarter.  I had thought this side was the better of the two, as the outer rocker seems solid, but I wasn't expecting what I found.  The the carpet up and the rear seats out I started tapping with a screwdriver and lots started to fall out:


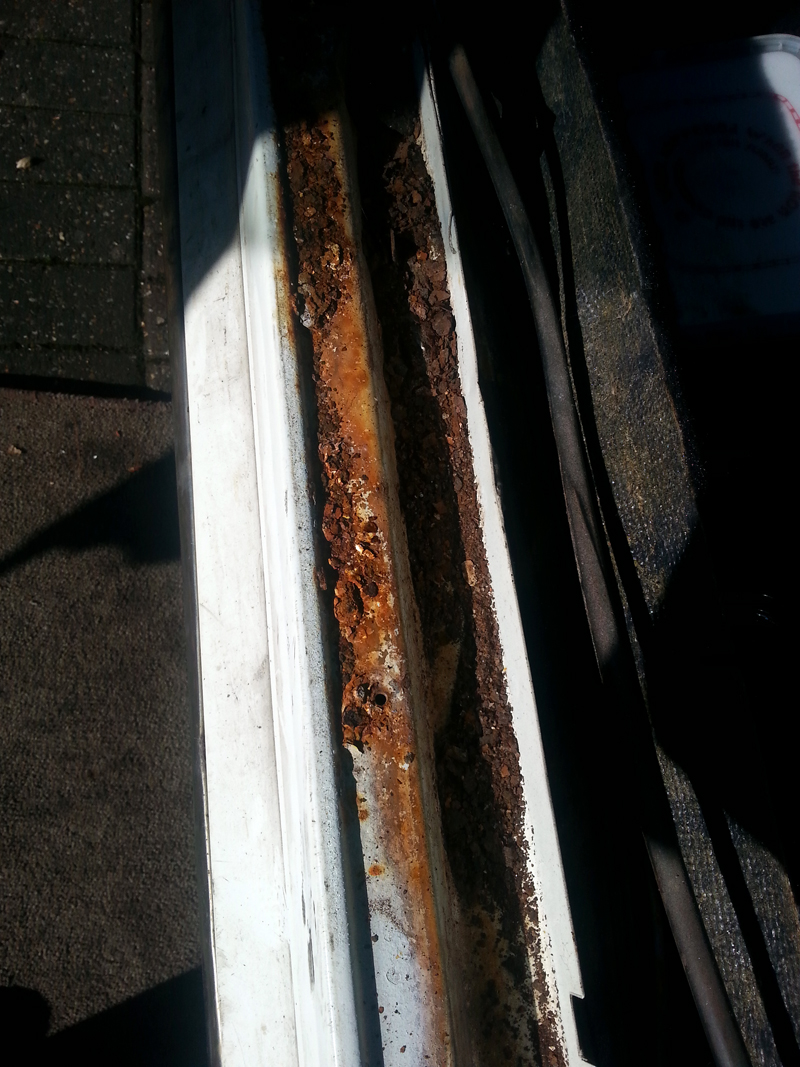
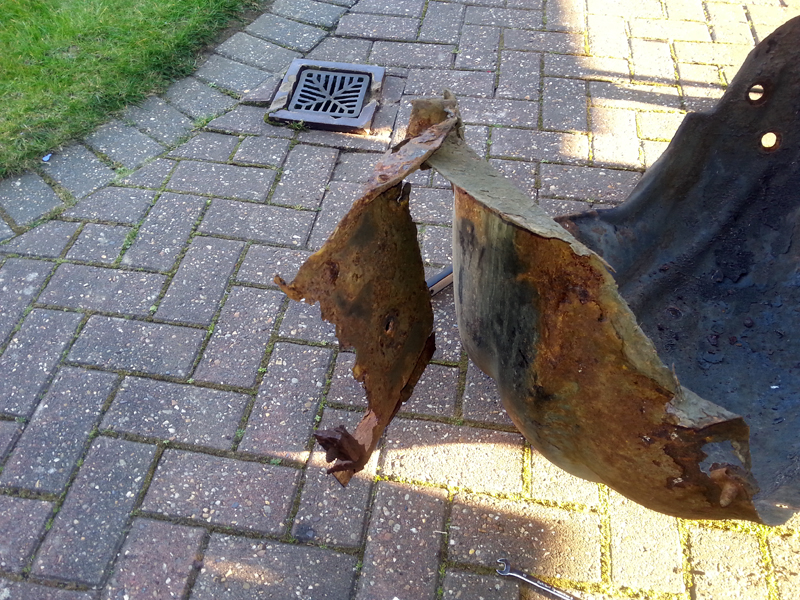
There was quite a bit of damage to the inner wheelhouse, inner sill and floor:


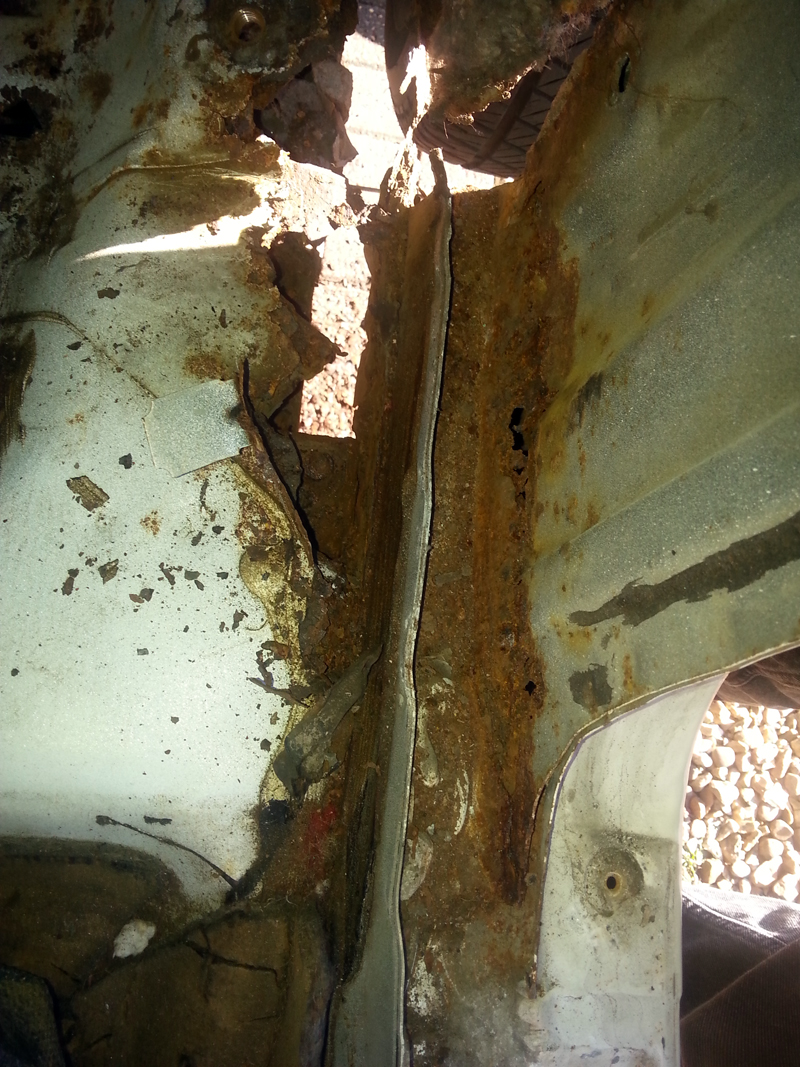
It's not quite as bad as it looks in this picture - the sharp pointy bit on the left is sunlight/shadow.


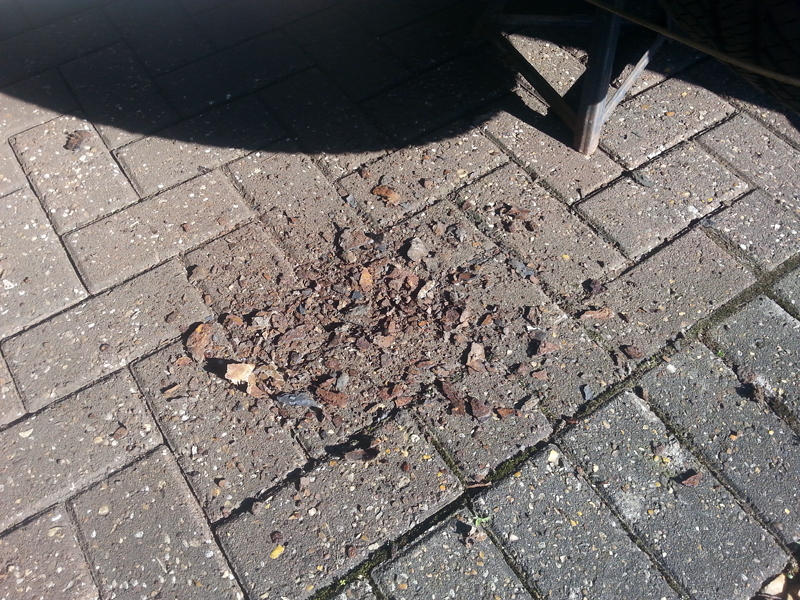
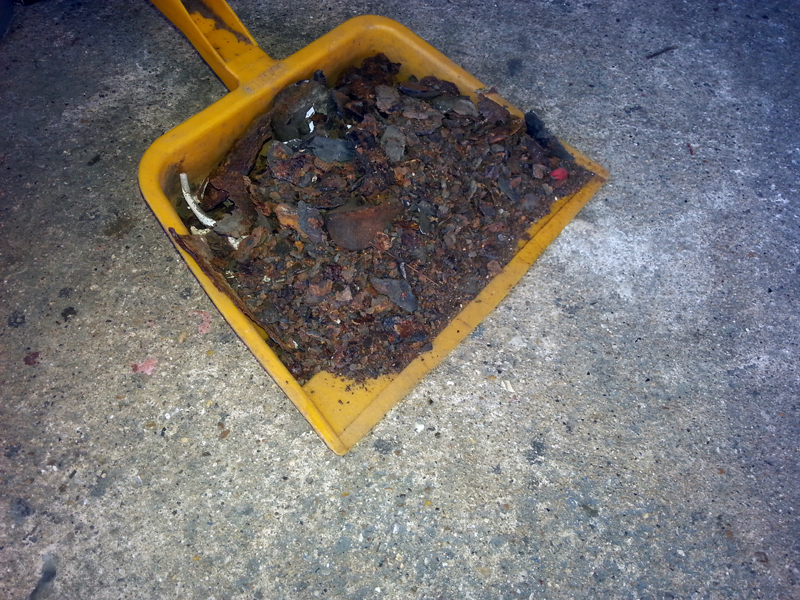
By the time I'd finished digging, there was a very large pile of rust to get rid of:


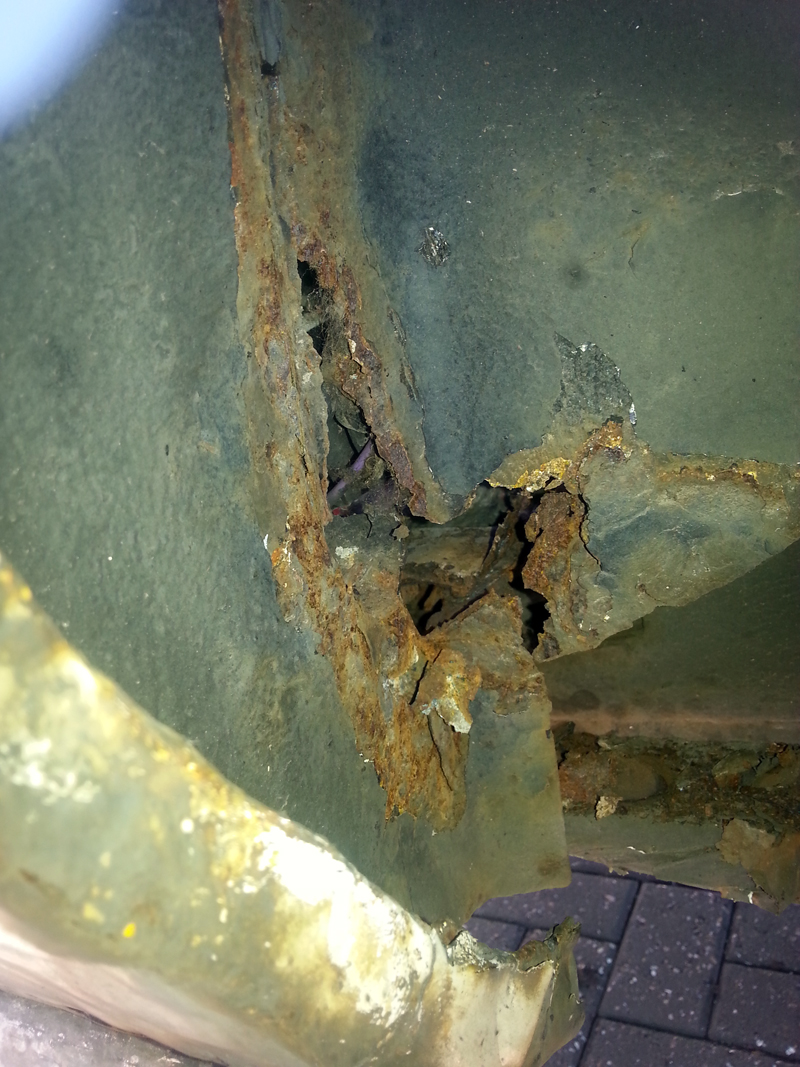
I also found a bit of damage to the top of the outer sill, but I am hoping that this can be patched:


After finding this, I took a closer look at the passenger side and dug a bit more rust out, finding it too was worse than I thought. I've decided to purchase the inner wheel house sections that will patch the vertical panels. The passenger side floor will be covered by the replacement pan I've ordered, but the affected area of the Drivers side isn't big enough (and covers 2 seperate panels) to warrant buying full panels, so I will fabricate some patches to fit.


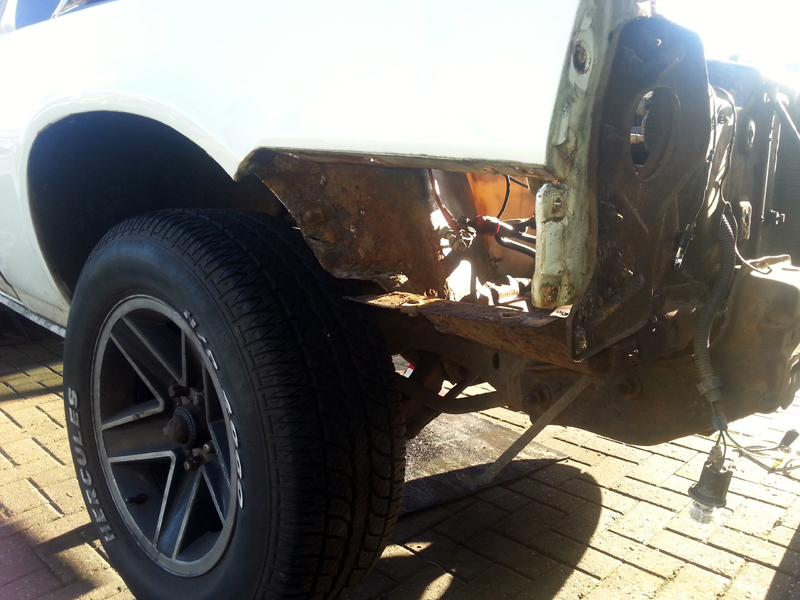
After those depressing findings, I moved back to the outside and front of the car.  Having done most of the prep work during the week, it was just for large nuts and the nose cone/bumber was removed:


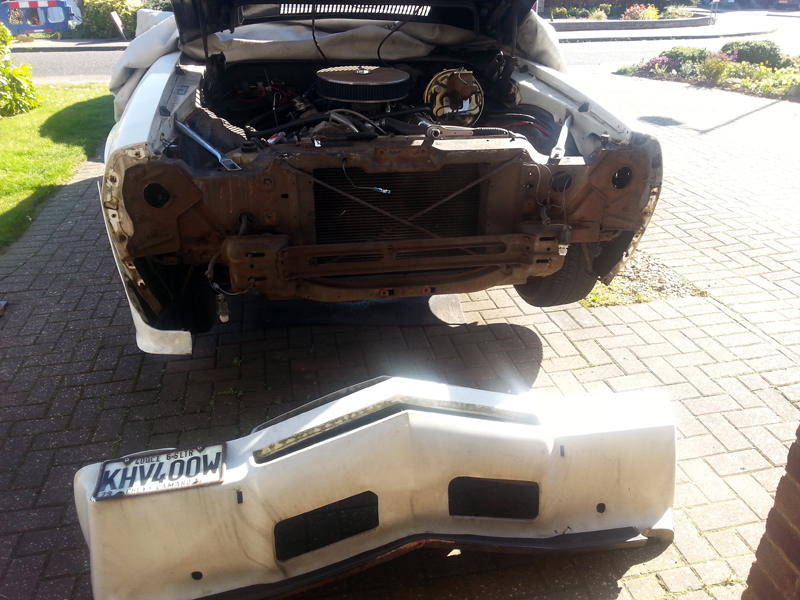
The weight wasn't as big a problem as I had expected, but the sheer size of it was.  It was too big to fit where I was expecting to put it, so for now it is going to live under the front of the car.

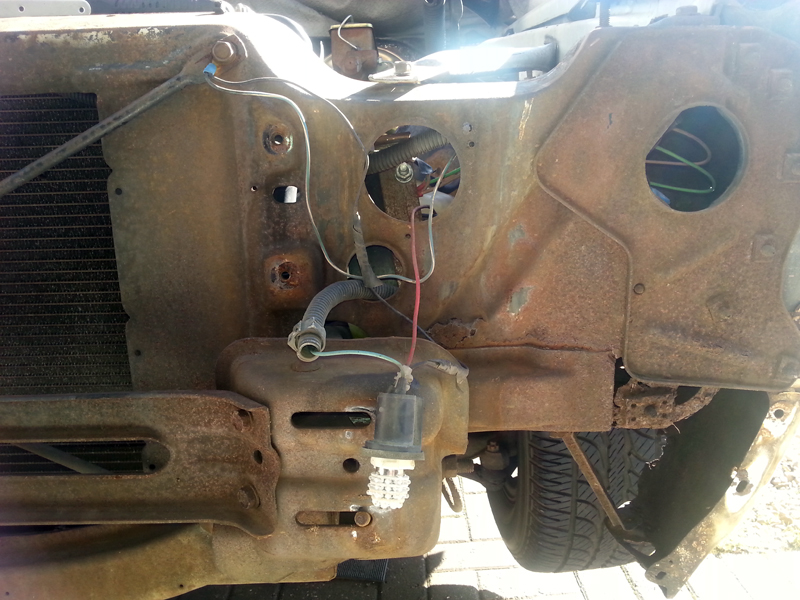
That revealed the core support and showed that there is some repairs needed to both lower corners, but it didn't look too bad overall:


With that removed I had better access to get to the battery tray and fender extension.  I'd been using plenty of rust pentrant, but still ran into a number of seized bolts and snapped cage nuts. With a bit of a fight, I did eventually manage to remove the fender extension:


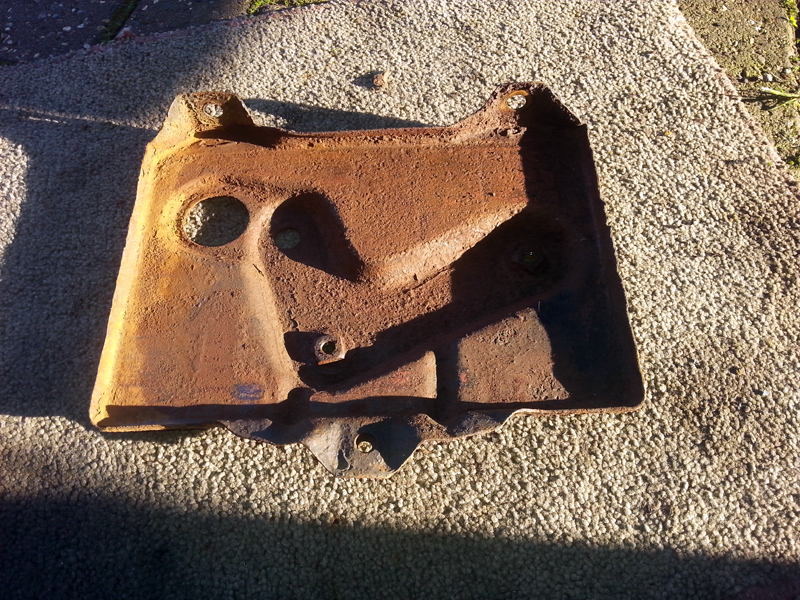
I changed tack on the battery tray and used some diferent tools, getting it out relatively easily. Give the amount of damage around it, it's in pretty good condition and should clean up nicely:


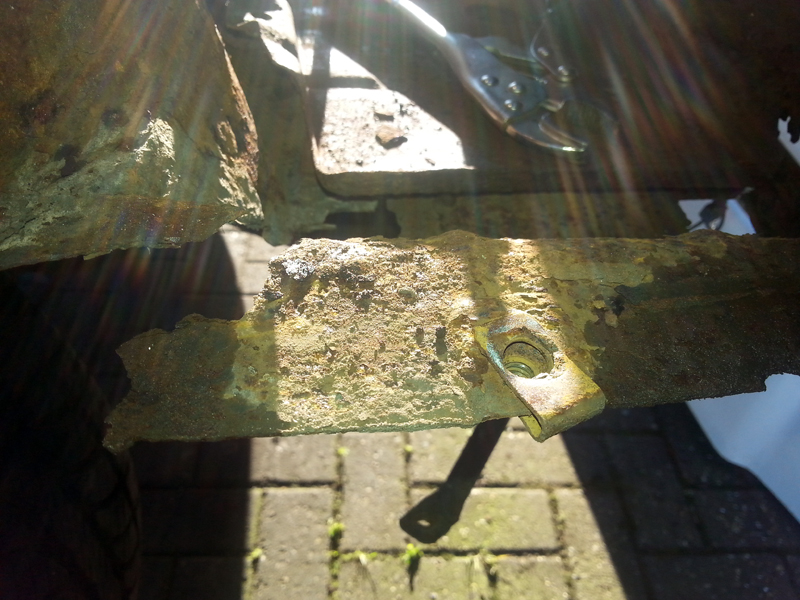
With the tray out of the way, I could clearly see the extent of the damage on the inner fender, and it was worse than expected. There is just an inch of metal holding the front piece to the main arch.


I figured I may as well take it out now. Had problems with a couple of the bolts into the fender, meaning the fender will need some attention later, but it came out with ease - actually it fell out of it's own accord once the last bolt was free:


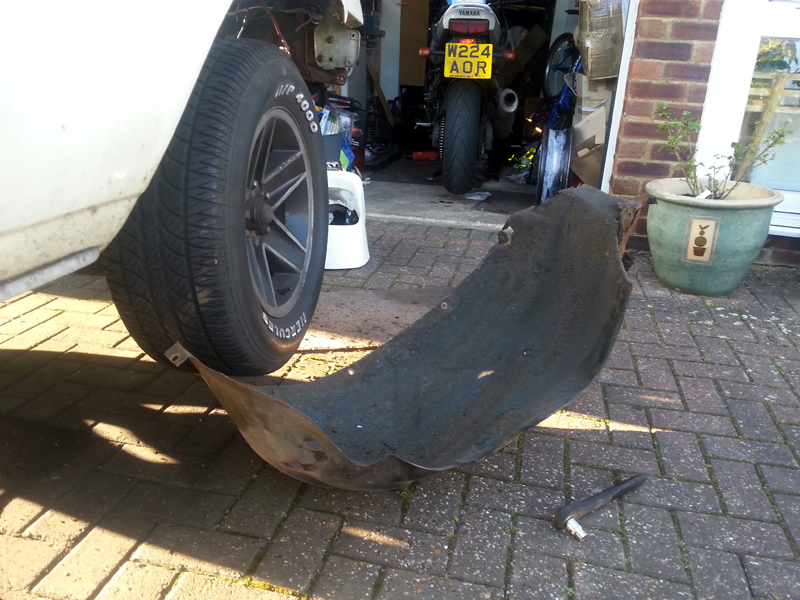
I'm sure it's not supposed to bend like that:


With this being the 'good' side, and knowing the other side is completely separated, I decided that I would have to order the new replacements now.  These bolt to the core support, in an area where the metal has rusted/gone, and I need a solid inner fender to match the repairs up to.

Thankfully I've got 3 days left before the shipment leaves the US, and NPD Florida had the 4 panels I want in stock. They should be there in plenty of time.  I'm now wondering if I will be able to pick up all of these new panels in one trip when it arrives in the UK!!

Jamieg285

  • Pimp
  • *
  • Posts: 7356
    • View Profile
    • http://www.mfatw.com/WD
'79 Camaro - Major surgery
« Reply #40 on: March 25, 2014, 08:24:57 am »
Managed a few hours over the weekend.  A lot of this time was spent trying to remove the drivers inner fender.  The corrosion was worse on this side meaning double trouble.  Instead of breaking captured nuts, a number of fixings were seized solid.  I couldn't get any real purchase on them to break them free, as the front panels weren't really connected due to the rust and the panels were flexing as I tried turning the bolts.  The real problem was the inner most bolt. I'm not sure if it was supposed to be going into a captured nut that had broken, or it was a nut that needed a spanner on it. Either way it was hidden and very difficult to get to.  The only access was through the side with part of the inner fender bent out of the way, through a gap about half inch wide and a couple of inches high. Eventually I got to it with some needle nose vice grips and a screwdriver to stop them sliding off.  


With that done, I moved back to the frame repairs.  I flipped it over and welded the back side of the plate. Not sure why, but it welded much better this time (gas pressure?) A bit of work cutting and grinding with a dremel in the area where the bushing will go and it was all done.  


Back on the topside I welding in a couple of pin holes that remained and ground back to flat.


A quick splash of etch primer


and ready for another coat of Hammerite.


It wasn't until it had dried the next day and I was standing it up again that I realised that I'd missed the end of the opposite arm, and this will need touching up at a later date.


I only had a short time on the Sunday, so I made a start on getting the exhaust out. I must have made a good job installing it, as it wasn't easy to seperate some of the joints. End result was I only managed to get the front X-pipe section and mufflers out. The rear pipes will have to wait for another day, perhaps after I've dropped the rear end/springs will make it easier.


Due to network outage at work yesterday, I was able to work from home, with gave me some bonus time at my lunch break and immediately after work time finished.  I turned my attention to the rear of the car, preparing to remove the springs.  In order to get to the bolts for the rear shackles, thew first thing out was the fuel tank, using the tried and tested method of balancing it on a jack, only for it to fall off as the jack is lowered


It looks past it's best, but a new one is outside the already overspent budget. It's not leaking, so I'll carefully clean it and give it a fresh coat of paint.

Final job for the day was to remove the fuel line. I wasn't expecting any problems with this, as it was replaced only a couple of years ago. The bolts did come out with relative ease, but all bar one of the P-clips split. I'll be looking for some better quality ones when it comes to refitting.

Rob

  • Filthy Ho
  • *
  • Posts: 2515
    • View Profile
'79 Camaro - Major surgery
« Reply #41 on: March 25, 2014, 12:23:39 pm »
Bought these clamps for when I put all mine back...... Probably similar to what you've already got.


http://cpc.farnell.com/1/1/91359-rubber-clamp-assortment-d01882-duratool.html

Roadkill

  • Guest
'79 Camaro - Major surgery
« Reply #42 on: March 25, 2014, 01:03:02 pm »
Yeah, looks the same as the ones I used on the Camaro.  The rubber inserts perish pretty quick, I found.

Thinking of using a piece of silicone hose sliced into a "C" around the metal pipes next time, then the clip (without the rubber obviously).

art b

  • Pro Pimp
  • *
  • Posts: 8917
    • View Profile
'79 Camaro - Major surgery
« Reply #43 on: March 26, 2014, 11:17:27 am »
nice work and pictures ...

it looks like you have got a hold on it...good luck with it
This forum needs, ''YOU'' posting,Not just reading ! :moon:

Jamieg285

  • Pimp
  • *
  • Posts: 7356
    • View Profile
    • http://www.mfatw.com/WD
'79 Camaro - Major surgery
« Reply #44 on: April 02, 2014, 01:11:54 pm »
I can barely call this weeks installment an update, there certainly hasn't been much progress.

Most of the weekend was taken up with family stuff so I took Monday afternoon off to make up some time.  I ended up cutting the grass, fitting fence panels and going out to buy a new lawn mower.  I only got 1 hour on what I had planned to do, and I didn't even touch the car in that time.  

What I did do was extract my engine crane from it's storage at the back of the garage, re-build it and apply some grease to the wheels and bearings.


I managed to sneak in an extra hour on Weds evening after work, but didn't get too far there either. I'd moved on to removing the front suspension, stating with the passenger tie rod. That one nut took me almost half an hour and half my tool box to get out. Note to self, make sure you undo the nut fully before breaking the taper seal.
I had to resort to a nut splitter in the end:


After that I only had time to remove the nut on the sway bar link, even that put up a fight and I didn't get as far as freeing and removing the bolt.

Hopefully I will get on better next time.

Jamieg285

  • Pimp
  • *
  • Posts: 7356
    • View Profile
    • http://www.mfatw.com/WD
'79 Camaro - Major surgery
« Reply #45 on: April 06, 2014, 08:10:24 am »
I found a couple of hours yesterday, so continued with pulling the suspension apart.

Once again, I didn't get as much done as I had hoped, largely due to stubborn rusty split pins. Anyway, at the point of running out of time I'd managed to separate the ball joints from the spindle, remove the shock and dropped the lower a-arm from the frame. It was starting to get dark, so I had to leave it all swinging from the top am, waiting for the next stint. 

My shoulders are aching this morning, due to the heavy cranking of the ratchet, compressing and then ucompressing the spring. I'd forgotten just how strong they are and I'm not relishing the idea odd having to do the other side any time soon. 

Rain and family visits mean I probably won't get out there today, so I will get a bit of recovery time.

Jamieg285

  • Pimp
  • *
  • Posts: 7356
    • View Profile
    • http://www.mfatw.com/WD
'79 Camaro - Major surgery
« Reply #46 on: April 09, 2014, 08:46:17 pm »
I took the day off work and managed to get the morning on the car.

First job was to remove the passenger suspension which had been left hanging from last time.


That didn't take too long (Upper control arms will wait until the headers are out).


I don't remember fitting 2-part springs!


I then moved over to the drivers side, first removing what was left of the inner fender to give better access to the top of the shock. I ran into a problem with one of bolts, where the fender metal ripped and started to bend:


This gave me a perfect opportunity to try out my latest purchase:


Three quick slices later and the bolt was freed:


With the inner fender out, I was able to make quick work of the rest. Rather than going the manual route, I tried using an impact wrench on the spring compressor - and wished I'd done that the other side. It was a breeze, nice smooth and slow and under control. 2-part spring on this side too!


At least they have broken evenly and can be re-used, although I am planning on fitting some QA1 coil-over shocks instead. I'll keep these as spares:


All was going well until the last bolt, rear most one on the lower control arm.  No matter what I tried, I couldn't get it out. I've tried hammering as hard as I can and trying to unscrew the bolt, but it's not budging.  


I've found a thread with the exact same symptoms. It looks like the bolt has fused with the sleeve inside the bushing. It looks like the only solution will be to cut the bushing and bolt out. My last idea will be to try and get in there with a ball joint press, but I'm open to any other suggestions.

Roadkill

  • Guest
'79 Camaro - Major surgery
« Reply #47 on: April 10, 2014, 11:41:13 am »
Could you get a reciprocating saw (blade) in the gaps, either side between the arm and mount ?

I'm guessing there should be enough gap, then just cut the head and tail off the bolt, drop the arm out and press the whole bush out, bolt shaft n' all.


Jamieg285

  • Pimp
  • *
  • Posts: 7356
    • View Profile
    • http://www.mfatw.com/WD
'79 Camaro - Major surgery
« Reply #48 on: April 22, 2014, 12:03:31 pm »
Just finished 2 weeks off work, but only got about 2 days on the car.  The list of jobs done is fairly low, but the achievement factor feels quite high, I feel like I've made some decent progress.

First job of the day was to try getting that stuck LCA bolt out.  Turns out my ball joint press is about 1 inch too long.   I managed to get it almost in place and gave it a go, but only succeeded in bending the mounting tab.  Rather than trying to cut it out, I think I will leave it on there and sell it with the frame when the time comes.  I have a full spare set of arms that I can put on it too.

After giving up on that, next was removing the hood.  Somewhat foolishly I thought it would be fairly easy to do on my own with the assistance of the engine crane. Quite how I managed it without damaging anything (including myself) I don't know, but I do know I won't be attempting it again. I was planning to proudly write down the technique for others to use, but I think it's better to say get someone to help - it's easier and safer.


With that out of the way, I had clear access to pull the fenders. Nothing too tricky, just taking a few pics of the alignment shims for reference when it comes to refitting.


Both fenders are in better condition than I expected, but both could do with some TLC.  Both have had some strange looking patches in the past, and I'm not particularly happy with either of them, but I may or may not be able to do anything about them now and they may have to wait for a different project.


There was also some damage to the top of the drivers side, which I will try and sort out.


With the front end almost fully stripped, I moved underneath the car an set about separating the SFCs from the sub-frame.  Being carefull with the angle grinder and dremel cut-off tool to minimise the damage to both parts, I managed to cut 3 of the 4 sides out, before running out of time.  It took less than 30 mins per side, so it won't take long for the last remaining bit next time.


When packing away, I found something bad, which may come to haunt me later on in the rebuild.   Where I had laid the nose cone facing upwards, I hadn't realised there was nothing supporting the weight of the bumper structure and it has pulled away from the urethane cover, ripping several of the mounting holes. I don't know yet how much of a problem this will be, and suspect that I will have to make some custom brackets to hold it all back together again.


On the plus side, with the weight gone from the nose, it's far easier to handle and I've been able to move it to the back garden and out of the way.

Roadkill

  • Guest
'79 Camaro - Major surgery
« Reply #49 on: April 22, 2014, 12:35:17 pm »
Mixed bag of results.  Still some good progress made . . probably more important is the increase in "achievement factor" - always critical when enduring a long-running project.