Author Topic: '79 Camaro - Major surgery  (Read 31973 times)

FUBAR

  • Big Daddy Pimp
  • *
  • Posts: 14533
    • View Profile
'79 Camaro - Major surgery
« Reply #50 on: April 22, 2014, 05:59:03 pm »
This is an epic undertaking you've got here Jamie, you're making good progress though despite the "worse than I thought's" going through.

All I can say its a good job you are happy welding, when I had even just some of this stuff fixed on my old 3rd gen it cost me a small fortune because I had to pay someone to do it for me (and they bodged 1/2 of it (no not Rocky FYI, the guy at the Milton Keynes Garage I took it too))

I may not comment much but i'm watching with intent cos there's stuff to be learnt all round

I always think cars like ours look really weird with the front all 'naked' like it is now.
It's the time that we kill that keeps us alive...

Jamieg285

  • Pimp
  • *
  • Posts: 7356
    • View Profile
    • http://www.mfatw.com/WD
'79 Camaro - Major surgery
« Reply #51 on: April 23, 2014, 07:01:30 am »
Thanks for the comments Ryan. There were a few reasons for starting a project thread, with 2 of the main ones being able to pass on knowledge, whether it be successes or failures, and to also get feedback and encouragement - it all helps.

Put in another 3/4 hour yesterday evening, pulled the headers out and found that you can't remove the intermediate steering shaft without removing either the steering box or column.  Guess what's now high on the agenda...

I've got the afternoon off today, so will get a few more hours on it.

Rob

  • Filthy Ho
  • *
  • Posts: 2515
    • View Profile
'79 Camaro - Major surgery
« Reply #52 on: April 23, 2014, 08:28:19 am »
Nearly in as many pieces as my 77'....

Jamieg285

  • Pimp
  • *
  • Posts: 7356
    • View Profile
    • http://www.mfatw.com/WD
'79 Camaro - Major surgery
« Reply #53 on: April 24, 2014, 08:22:54 am »
Afternoon off yesterday, so got a good 3.5 hours work on the car.

I started by finishing the previous job, cutting out the last bit of weld joining the sub-frame to the SFC.  This one did take a bit longer than the others, due to the close proximity to the parking brake cable, which I eventually had to disconnect to make room for the Dremel.


Then I turned my attention back to the steering shaft.  The impact drill made short work of the steering box, but only after I had remembered to unhook the power steering hard lines and loosen the power steering pump to give some movement. With the box 'floating' it was a simple job to knock the shaft out, first from the firewall end, then prise the rag joint end off.


With this out, I finally confirmed my suspicions that it had been put on wrong. There are spline witness marks in the grease on the flat of the rag joint, showing that it had been installed 90 degrees out, which is why the steering wasn't centred properly.


It's worth pointing out at this time, I have all the parts ready to refurb the intermediate shaft - new rag joint and top boot.

I'm still undecided on whether I am going to try and transplant the front brake system intact, or if I need to separate it. Going with the former for now, I removed the brackets that hold the brake line to the frame:


One thing that is clearer, is that the front-rear brake line (and the redundant fuel vapour line) will need to come out for me to replace the torque box that side. I'm not ready to remove it yet, as I need the SFCs out first, so I simply split the connection at the rear and caught the drips as the MC emptied.  (See nice metal Coors bucket in pic further down )

With the frame no longer welded to anything, I'm getting closer to being able to drop it from the body. In preparation for this, I started checking for anything left that connects from the body to the frame or engine.  You often read about other peoples birds nest of wiring and I found lots of that - but this time it's all mine . I might see if I can tidy things up a bit more when I put things back together. I'm still considering removing all wiring and fitting the Painless loom that's been hiding in the garage for almost 8 years.  
I separated out a number of wires that feed into the body, and removed my junction box and additional fuses:


The last bit for now (I have left the distributor wires, as I will remove that later) was the speedo cables, both the original shaft drive and my own ones used on the electronic sender.


Last job for the day was to remove the rear shocks, getting ready to drop the rear end.  Drivers side came out relatively easily. The lower nuts needed lots of persuassion, but came out OK and access to one of the top bolts was impeded as the shock has moved on it's mounting bar.  I was able to pry it across a bit with a screwdriver and use a 1/4 drive socket to squeeze into the gap.


The passenger side was a different story. Bottom nuts came off easier, but the troubles came at the top. Rather than the expected bolts going up into the body, I find two M6 bolts coming out, with nuts holding the shock up.  One side came out OK, but the other got about 2/3rds down and the bolts starts spinning.  Oddly, despite this I was able to tighten it back up.  I ran out of time to deal with it, so will have to take another look next time. Hopefully I will be able to go back to the original bolts on re-assembly.

Some good news, I spent a bit of time having a root around in the garage, trying to find some of my stock and confirm what I had.  I confirmed I had some new sway-bar links, so don't need to go to the hassle of removing the seized ones.  I also found a shackle kit, and have the choice of rubber or poly, so will be asking questions on that soon. Unfortunately, I found a set of spring pocket bolts - I didn't need to buy another set of these after all.   The shackle kit also contained all of the necessary hardware to remount the rear end to the springs, so I'll probably separate them and clean them up and re-assemble.  Surprise find was a set of door hinge pins and bushes, so I might as well sort out the passenger door.

Jamieg285

  • Pimp
  • *
  • Posts: 7356
    • View Profile
    • http://www.mfatw.com/WD
'79 Camaro - Major surgery
« Reply #54 on: April 27, 2014, 08:17:06 pm »
I managed to get two good afternoons working on the car this weekend, with a mixed bag of results. On the positive side, I managed to hit the targets both days (all bar one bolt, more later). I'll go through the bad at the end of the update.

Saturdays target was to get the rear springs out and remove the rear end.  I'd already pulled the fuel tank out and removed the inner nut from each shackle.  The tail pipes were previously in the way of the outer nuts, so the first job was getting these out.  To do this I need to move the axle stands from under the rear end to support the body, and let the rear end droop, and then remove the rearmost exhaust hangers from the side of the rear frame.  That's when I spotted this:

I checked the other side, which appears to look OK, so I would need to take a closer look later.


With the tail pipes out, I was able to access the outer nut, although it still wasn't easy to get to - I couldn't get a ratchet in there.  One side came off OK, the other side was stiff, up to the point where the bolt sheared!

Before going any further, I realised I needed to detach the springs from the rear end.  Knowing that there was likely to be problems with the bolts, I brought out the impact wrench and disc cutter.  The wrench worked well with the first two bolts, but that turned out to be a false impression of how well it would work, as the next two wouldn't move at all, and the other four all rounded off.  To get the others out I had to cut through both sides of the U-bolts and cut the heads off the T-bolts, none of which caused too much trouble. With the bolts off, I was pleased to see the springs drop down from the rear end, although on the drivers side, the lower leaf also fell off.


Looking closer I can see there is a nut left in the spring mount, that should hold the lower springs onto the pack. Hopefully this will be able to go back, although I may try and find out if I can not refit the lower one to soften the rear end a bit.


The passenger side came out intact, but as I had suspected a number of years ago, the rear had been misaligned. The mark in the spring pad shows that the bolt was nowhere near centered:


Back to the shackles, the passenger side separated relatively easily. I was driving out the top bolt with a punch and the outer plate was moving out with the bolt. It was the lower one that had sheared, so after a small amount of movement the inner plate was free and I was I able to remove the spring. I had to pull the top bolt back into the frame so I could get a clamp around the outer plate, so that I could split it from the bolt. Once out, I was able to use a screw driver and hammer to prise/punch out the bushes, which turned out to be poly ones.  

The drivers side wasn't quite as easy. I wasn't able to get either of the bolts or plates to move. Instead I used the disc cutter to split the inner plate in two, which allowed me to remove the lower bolt and the spring, then going on to drive the top bolt out, although there was quite a lot of debris that was falling:

More on this later.

With the rears of the springs out, I moved the front spring pockets, with some trepidation as I have read plenty of stories of the clips nuts braking and the bolts needing to be cut out. Fortunately, there were few problems. The passenger side came straight out with no bother, and I was able to inspect the spring.


The spring pocket looks a bit dodgy, thankfully I have some spares ready


The drivers was, again, a differnt story. The first bolt came out OK, but the second one split. Fortunately, it was the one best placed to get a clamp on - there is a benefit to rusted out floors after all - you can see what you are doing:


The final bolt though, is not coming out yet.  The SFC has been welded in such a way that it is blocking me getting a socket on it. Box wrench is not working it, and although I have a thinner wall socket it the bolt, it's a 12-point and is threatening to strip the head.  I think it can wait till the SFC is out, so I have left it for now.


So, apart from that one bolt stopping me getting the spring out, the target for the day had been reached and I was relatively happy.

Now the bad news.  I rechecked the rear frame after removing the bushes, and found significant rust hole. It's not overly large, and the surrounding metal appears all OK, but the location of it makes it look very tricky to repair.  I will be taking a further look later and doing some more research to see what options I have.

Jamieg285

  • Pimp
  • *
  • Posts: 7356
    • View Profile
    • http://www.mfatw.com/WD
'79 Camaro - Major surgery
« Reply #55 on: April 27, 2014, 08:47:17 pm »
The target for today was to separate the front sub-frame from the body.  

I started underneath the car, removing the prop shaft:


With that out of the way, I fitted the newly acquired trans plug, to keep the fluid from spilling out.


I also disconnected the bracket for the trans shifter cable, so that it could articulate freely. The cable was long enough that it didn't need to be removed.


Next was going to be the fuel line, but a lack of forward thinking when I fitted it meant it has to stay on the car.


The final job here now was to lift the car up and move the jack stands from the frame to the body, using a block of wood each side to spread the load. The jack stands where carefully placed as far apart as possible to leave space for the frame to be lowered between them.

I thought it would be OK and I would be able to feed it back from the front, as the connection to the pump is a hose barb, however there is a joint I'd forgotten about which meant that wouldn't work either. In the end I just had to hope there would be enough slack in it, which fortunately there was.


That was the underside sorted, so it was back to the top side, in what's left of the engine bay.  A double check on the wiring, but I did spot the throttle cable needed to be removed too(although later I had to remove the carb as well anyway)


I split the master cylinder from the booster, so that it would drop down with the frame. The booster can be taken off later, if necessary.

I checked underneath for clearance, to make sure neither the engine or trans would hit the floor when the frame was lowered, which they wouldn't. I did spot the remaining suspension parts were drooping, so tied them up out of the way.


I got the hoist and and roughly in place, opting to use a load leveller, in case the engine/trans/frame combination was going to cause any problems. Using this meant I needed to remove the carb and the distributor to make room for it and the chains.


Everything was now in place and the hoist was setup to take the slack.  Seeing just how much the nose was lifting with no movement in the body, showed me just how much flex there is in the front, and makes me certain that I will fit G-braces when I get to the rebuild.


I was expecting a fight from the body mount bolts, but they turned out to be some of the easiest bolts I've used on the car. Although more than 10 years since they were fitted, they were done so with plenty of copper grease and were in great condition. As the last ones were removed, the frame started to lower, so I put a trolley jack under the rear section, just in case it dropped suddenly. Thankfully it didn't, but I then had a different problem. The front was dropping nicely, I could see the rear was moving, bit it wasn't dropping out of the SFCs. It turns our the back end of the frame is angled upwards, so wasn't able to drop straight down. I was now in a position of the weight being held by the hoist, but not able to move it.


I moved to the front and gave the hoist a few big tugs, hoping to pull the frame slightly forwards and allow the rear to break free.  Thankfully it did, and it was also pretty well balanced.  The tugs had moved the whole thing further fowards than I had hoped, so had to try and push it back again, but not so far that it hit the body.  I ended up using the load leveller to shift it backwards, which worked quite well.

With it lined up roughly where I wanted it, I just had to carefully lower it down, only to find that it would land on the long legs of the hoist.  Out with a borrowed set of axle stands, placed under the front of the frame, which gave just enough clearance to drop it down and have clearance to remove the hoist.


Everything was then packed up and away, and I was only 5 mins late for the evening meal!  I even managed to keep the car looking reasonably presentable for the neighbours:


All in all a good weekend. It won't be long before I can actually get on and do the jobs that I have been preparing for.

Roadkill

  • Guest
'79 Camaro - Major surgery
« Reply #56 on: April 28, 2014, 10:34:28 am »
Quoting: Jamieg285
newly acquired trans plug, to keep the fluid from spilling out.


Simple and effective.  

Quoting: Jamieg285
I even managed to keep the car looking reasonably presentable for the neighbours


Big girl !

Good progress !  

I must admit I do miss having a nice smooth driveway to work on.  I'm getting too old for gravel.  

Jamieg285

  • Pimp
  • *
  • Posts: 7356
    • View Profile
    • http://www.mfatw.com/WD
'79 Camaro - Major surgery
« Reply #57 on: April 28, 2014, 10:59:42 am »
Quoting: Roadkill
Simple and effective.  


Oi, who you calling simple  


Quoting: Roadkill
Big girl !  


We had a few years of problems with them after the last one. They've calmed down a bit in the last couple of years and I'm trying not to provoke them.


Quoting: Roadkill
I must admit I do miss having a nice smooth driveway to work on. I'm getting too old for gravel.  


Block paving isn't exactly smooth, but at least it's level and solid. There is a 1/2 metre wide strip of gravel down the drivers side of the drive, which is a pain. I'm glad I don't have to work on a full driveway of it.

Rob

  • Filthy Ho
  • *
  • Posts: 2515
    • View Profile
'79 Camaro - Major surgery
« Reply #58 on: April 28, 2014, 11:12:22 am »
Quoting: Jamieg285
Now the bad news.  I rechecked the rear frame after removing the bushes, and found significant rust hole


Looks very familiar.  I'm still tackling the rear frame rails on mine

Jamieg285

  • Pimp
  • *
  • Posts: 7356
    • View Profile
    • http://www.mfatw.com/WD
'79 Camaro - Major surgery
« Reply #59 on: April 29, 2014, 01:14:53 pm »
Got a couple of hours in yesterday evening, and had a couple of changes of scenery.  

First off I started pulling out the interior.  I'd already got most of the seats and side panels out earlier when I was checking out the condition of the floor.  I was able to take down all of the panels around the roof and sun-visors. The lower dash on the drivers side came out, and the steering column was dropped to make removal of the gauge bezels easier.


Many years ago I fitted a set of Autometer gauges directly to a slightly modified original bezel.


The plastic was quite thin and brittle when I fitted it originally, and the attempts to hold it together weren't working out so well and I am in danger of the panel breaking in two.


I took the decision to stop on the car for a while, and take on a sub-project of improving the gauge mounting.

I wanted to retain the look of stock bezel, but the weight of the gauges was proving too much for the ageing plastic.  Taking inspiration from the custom aluminium gauge mounts I've seen, I figured the best way to strengthen it would be to put a solid panel across the whole back face where the gauges go.

I measured the bezel and headed to the local B&Q to look for a suitable piece of metal.  I'd thought of going for aluminium to keep the weight down, but the bits they had were too thin and wouldn't add much structural benefit. The steel was thicker, but much heavier. Ideally I wanted either of the metals in the thickness that the other one came in, but no luck there.  The compromise was some perforated steel. Still pretty stiff, but with lots of voids to lower the weight. It should also provide lots of edges for the glue to take hold, although the gauge mounts will clamp the metal to the bezel anyway. A bit of glue should help to stop flexing.

First job was to remove all of the gauges and wires and set them aside.


Initially I thought I'd be able to lay the bezel on top of the metal and trace around the holes, however the back of the bezel is far from flat and that wouldn't work.  Instead I cut out a template from an old cereal box, laid that on the back of the bezel and marked the holes on the carboard.


Then simply transfer the carboard to the metal and mark again.


Didn't have time to go any further, but I'll be digging out the Dremel cutter again as soon as time allows.

Roadkill

  • Guest
'79 Camaro - Major surgery
« Reply #60 on: May 01, 2014, 07:51:11 am »
If you can get that on a .Dwg or .Dxf file I could have it laser-cut if you want ?

Unless you want that patterning ?

Jamieg285

  • Pimp
  • *
  • Posts: 7356
    • View Profile
    • http://www.mfatw.com/WD
'79 Camaro - Major surgery
« Reply #61 on: May 01, 2014, 08:15:40 am »
That would be really cool, but un-necessary.  The metal is going on the back side of the panel and is purely structural.

To be honest, it will probably look crap by the time I've finished, but that will also be in the knowledge that it won't be seen.  Would be a different story if I was replacing the whole bezel.

Roadkill

  • Guest
'79 Camaro - Major surgery
« Reply #62 on: May 01, 2014, 08:58:40 am »
Ah, O.K, fair enough.

Jamieg285

  • Pimp
  • *
  • Posts: 7356
    • View Profile
    • http://www.mfatw.com/WD
'79 Camaro - Major surgery
« Reply #63 on: May 02, 2014, 07:43:38 am »
No physical progress to report, but things are still happening, and good things at that.

The container was due into port yesterday and my shipment may be ready for collection tomorrow.  

I've also come up trumps on a solution to the rear frame rail problem.  A new rail was looking at over £300 per side(after shipping) and a manual patch repair was never the best option.  Well, thanks to Rob () I've located a used one in excellent condition - in the UK.  Even better, the guy needs to collect a wing from Dunstable, so has agreed that if I act as courier I can get the frame rail at a better price - result.

Rob

  • Filthy Ho
  • *
  • Posts: 2515
    • View Profile
'79 Camaro - Major surgery
« Reply #64 on: May 03, 2014, 07:27:53 am »
Quoting: Jamieg285
Well, thanks to Rob


Finger on the pulse.....

Jamieg285

  • Pimp
  • *
  • Posts: 7356
    • View Profile
    • http://www.mfatw.com/WD
'79 Camaro - Major surgery
« Reply #65 on: May 06, 2014, 01:27:12 pm »
Another weekend where I didn't get as much done as I had hoped, due to a stomach bug that is making it's way through the family. Thankfully I was feeling better by Sunday and was able to head over to Chelmsford to collect the parts that had finally arrived.  

There seems to be an unwritten rule that all boxes need to be at least twice the size of the things in them, and there was no way that I was going to get all the boxes in (1 full length floor pan, 1 inner rocker, 2 inner fenders, 2 inner wheelhouses, an oil pan, body bushes, and 2 torque boxes) in the back of my car without removing most of the packaging and piling them on top of each other. Thankfully having done that it did all go in and only one journey was necessary.

Having got home with them, the next puzzle was working out where to store them. I've ended up with some in the shed, some in the attic, some in the car and just a couple of bits in the garage. Hopefully I'll be able to make some good progress and start using them and freeing up the space again.

Monday was a bank holiday, so a day off work. Feeling much better and keen to make up for lost time I got out as early as I could and spent the whole day outside. I'm getting good at estimating progress, as once again I got pretty much as far as I was hoping to get:

The morning started by continuing with the strip down of the interior.  After removing the glove box and getting better access to the last few bolts, I was able to slide out the dash pad.

This was swiftly moved straight into the house and into the loft. I can't afford for this to be damaged and need replacing.

With that out of the way I had clear access to get the kick panels out. The passenger side slides out relatively easily

The surrounding metal looks to be in good condition

So that's where the vent seal ended up


Drivers side wasn't quite so simple, as the e-brake lever needs removing first, but that wasn't much trouble at all

Again, the surrounding metal looks to be OK.

The front speakers were pulled out, and all of the heater ducting:


This gave me chance to look at the inner cowl area. Upper sides look a little rusty, but appear solid:


The lower section on the drivers side wasn't so good, I found/made a couple of small holes that is clearly where the water that had rotted the floor (repaired a few years ago) was coming from

I don't think I can get in there to do a proper repair now, so may have to do something temporary until I can remove the upper cowl panel and deal with it properly in a few years time.

Next up was the steering column. The firewall kick plate was removed, to reveal some unexpected rust


Not sure how that bit is rusty, but on complete removal I can see that it's past it and won't be suitable for transferring to the replacement 3rd gen column I've got lined up.


Not sure how it got in that condition, as the surrounding area is solid


Over on the passenger side, all that is remaining is the heater box. The bolts for this are on the outside, and for some unknown reason were in 4 different size bolts/nuts - I'm sure that's not stock.  2 of the bolts were very bent too, and I'll have to replace them when refitting.


The heater core looks to be in good condition, but I am unsure of it's age.  I'm in two minds on whether to replace it, as I may end up replacing it with an inferior aftermarket part.

The last two bits were the rear seating and the rear parcel shelf, complete with rear speakers. With those out I was stripped as far as needed to get on with the next jobs


Not bad for a mornings work!

Jamieg285

  • Pimp
  • *
  • Posts: 7356
    • View Profile
    • http://www.mfatw.com/WD
'79 Camaro - Major surgery
« Reply #66 on: May 06, 2014, 01:27:59 pm »
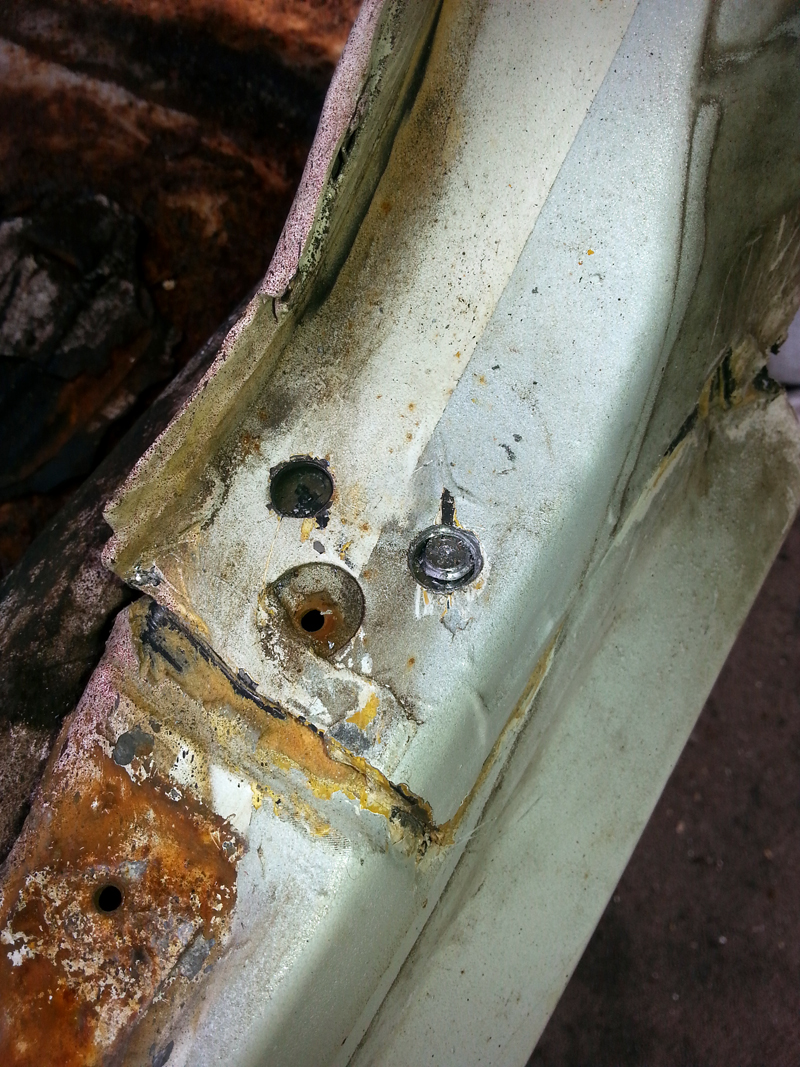
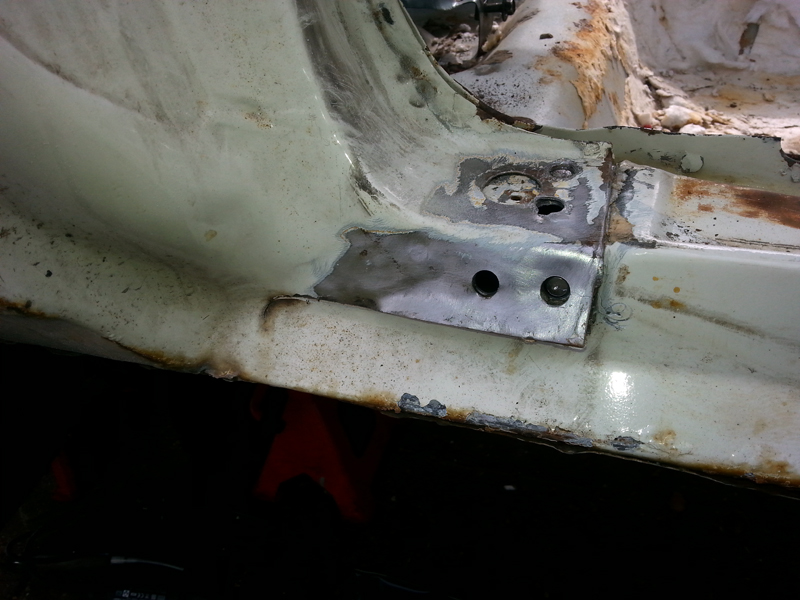
After lunch it was time to get serious and start tackling the outer rocker.  I'd read about using the door lines as a guide for fitment, but was aware of issues with the hinges on the passenger door.  The lower looked to be the worse of the two, and I'd got a re-built spare lower ready, so simply swapped them over.


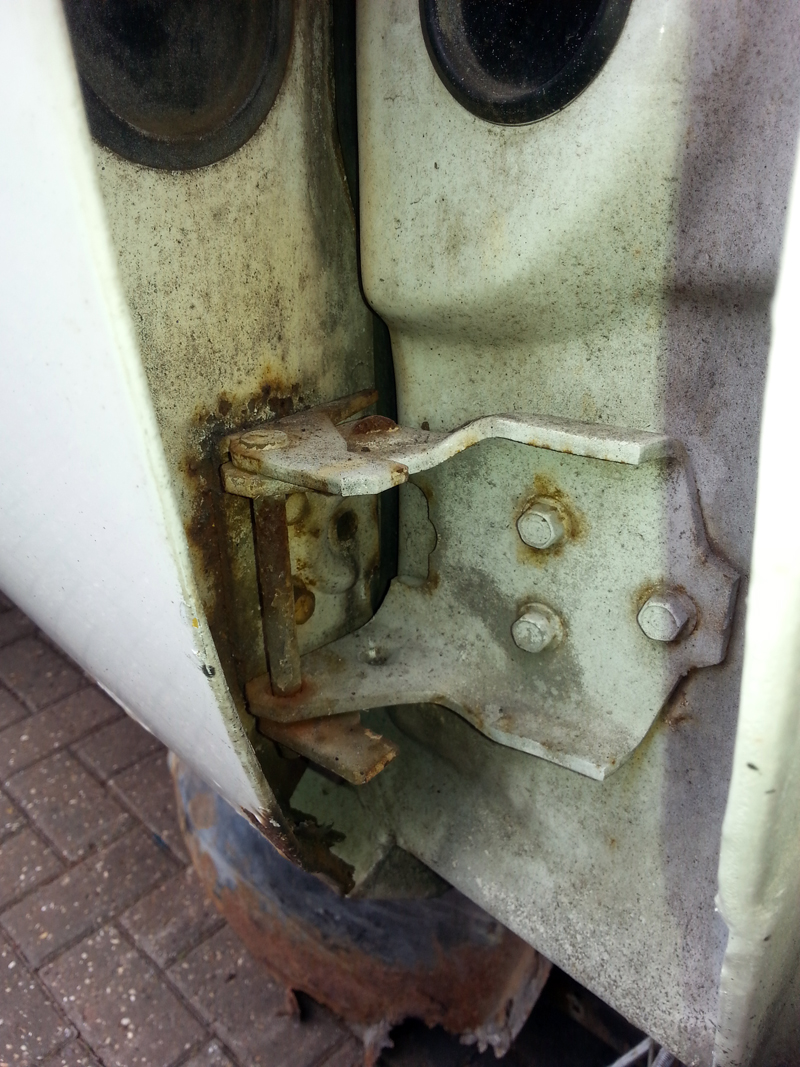
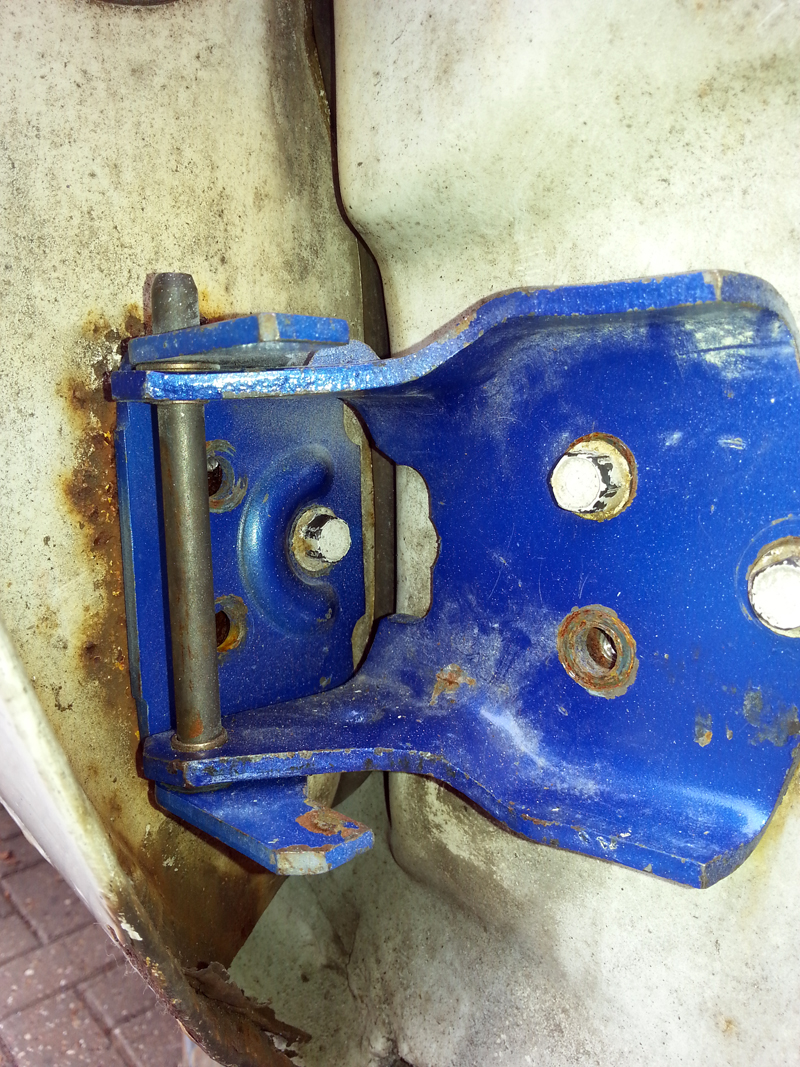
Well, you'd think it would be simple.  The eagle eyed amongst you will have spotted there are 3 bolts missing in the 2nd picture.  The two on the door side snapped on removal. The one on the body side I had to move to the remaining hole on the door, which thankfully wasn't stripped (in which case, I'm not sure why there wasn't one there originally).  I didn't want to do so, bit I will now have to remove the door completely in order to extract the broken bolts.  I could have done this today, but I didn't want to be distracted from the job I wanted to do, so it will be done later.

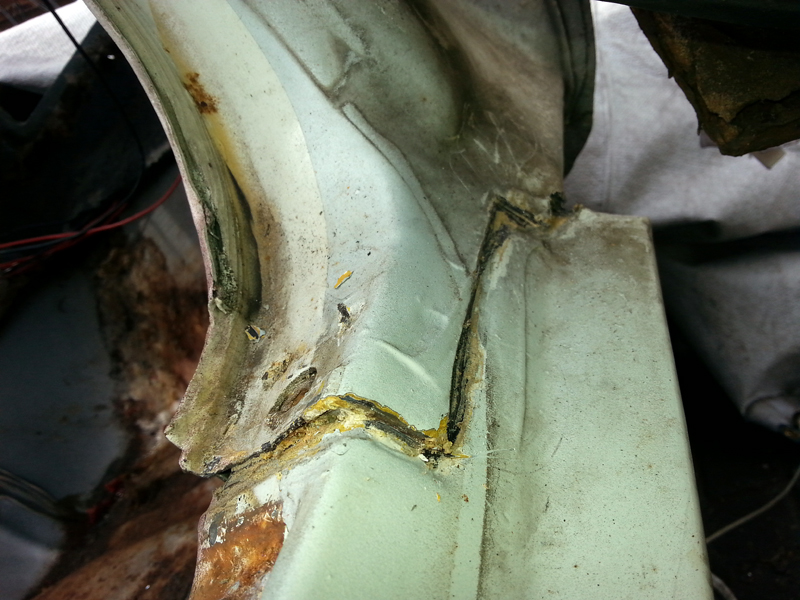
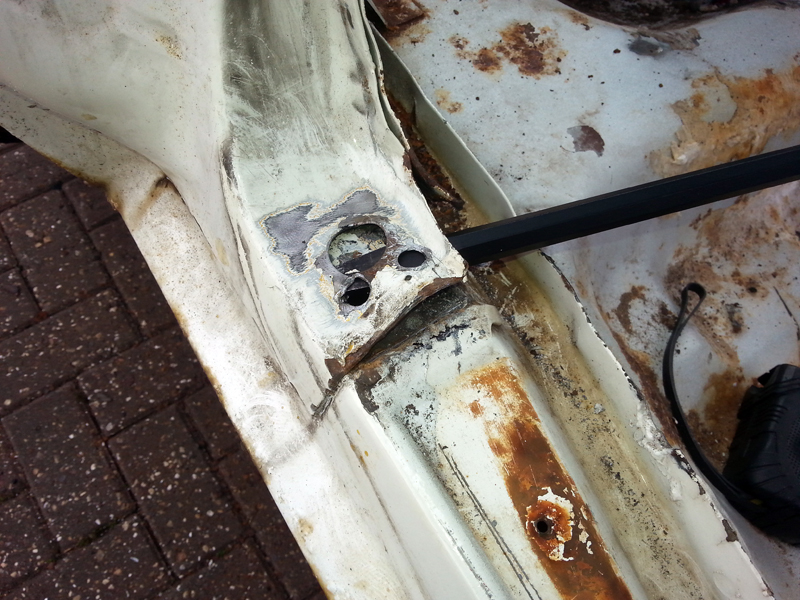
Onto the rocker panel, I started by scraping away some of the sealer/paint to get a clear indication of the borders of the panels, and start finding the spot welds. I found it useful to have the new panel next to me to use for reference


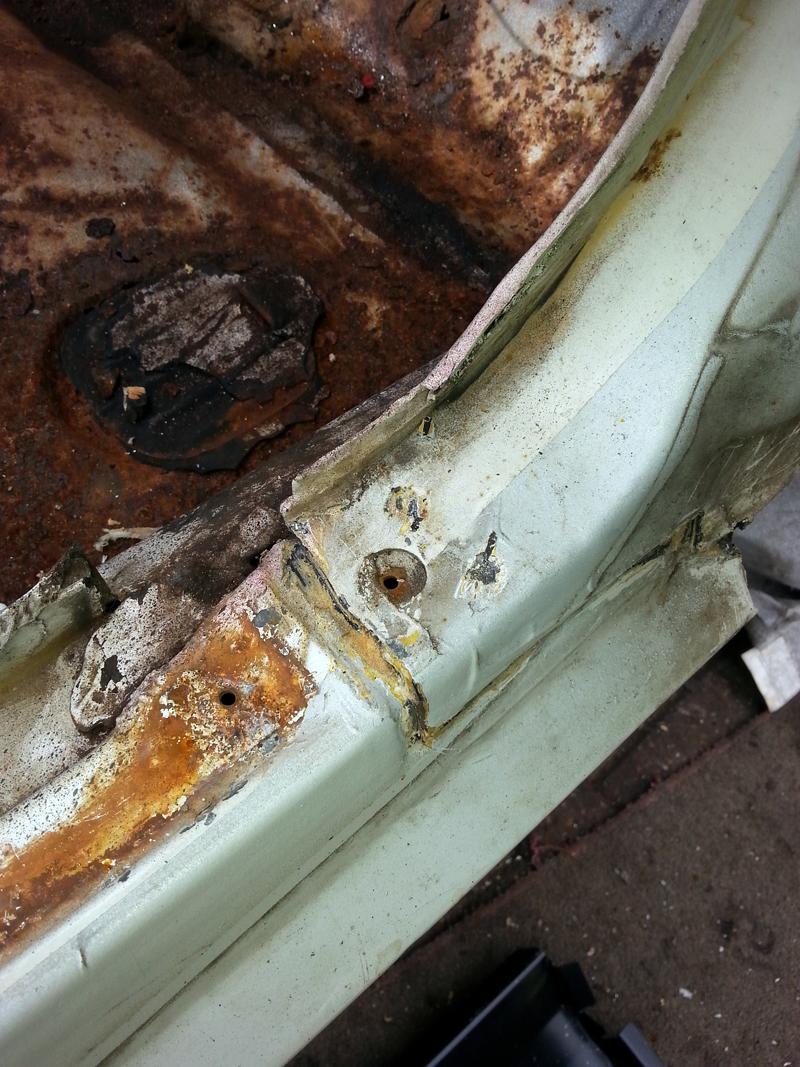
I drilled out the front and rear spot welds from the top edge of the panel, in case the bracing I was going to add impeded me in any way


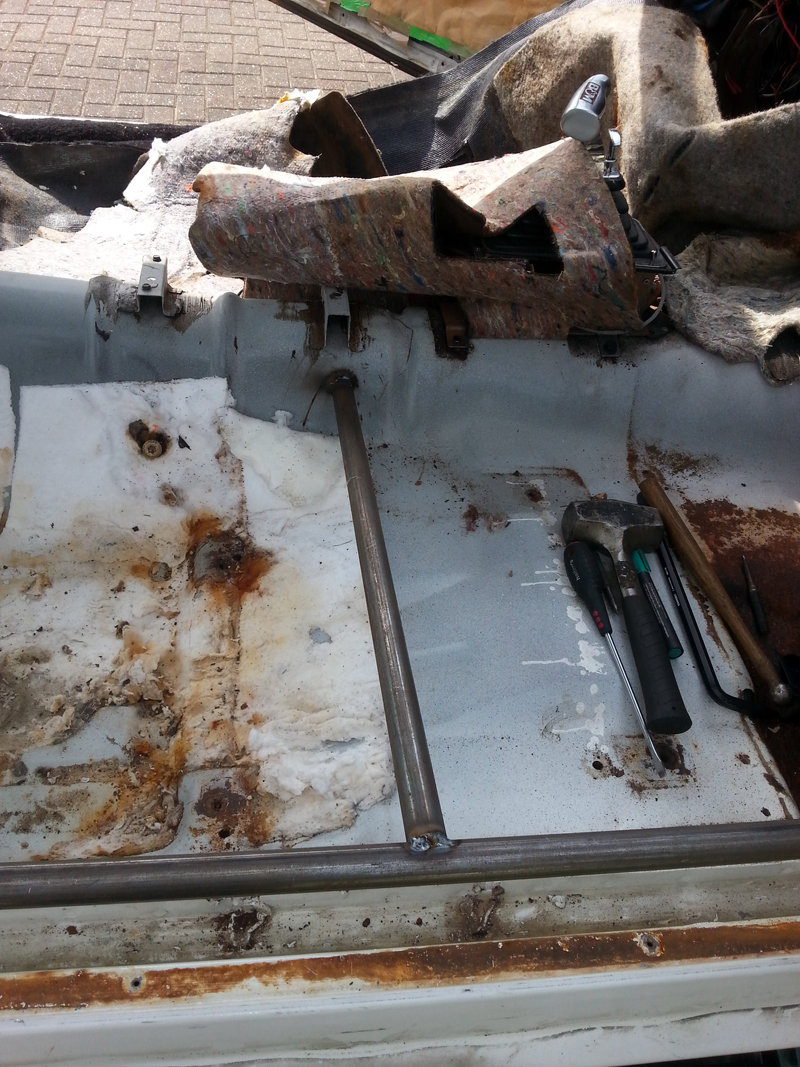
I then measured the door gap from front to rear, about six inches up from the rocker and cut a bit of tube to match, then cut half of the last inch of each end to give a flat surface to mate with the body. This was then tack welded into place, securing the front and rear in place


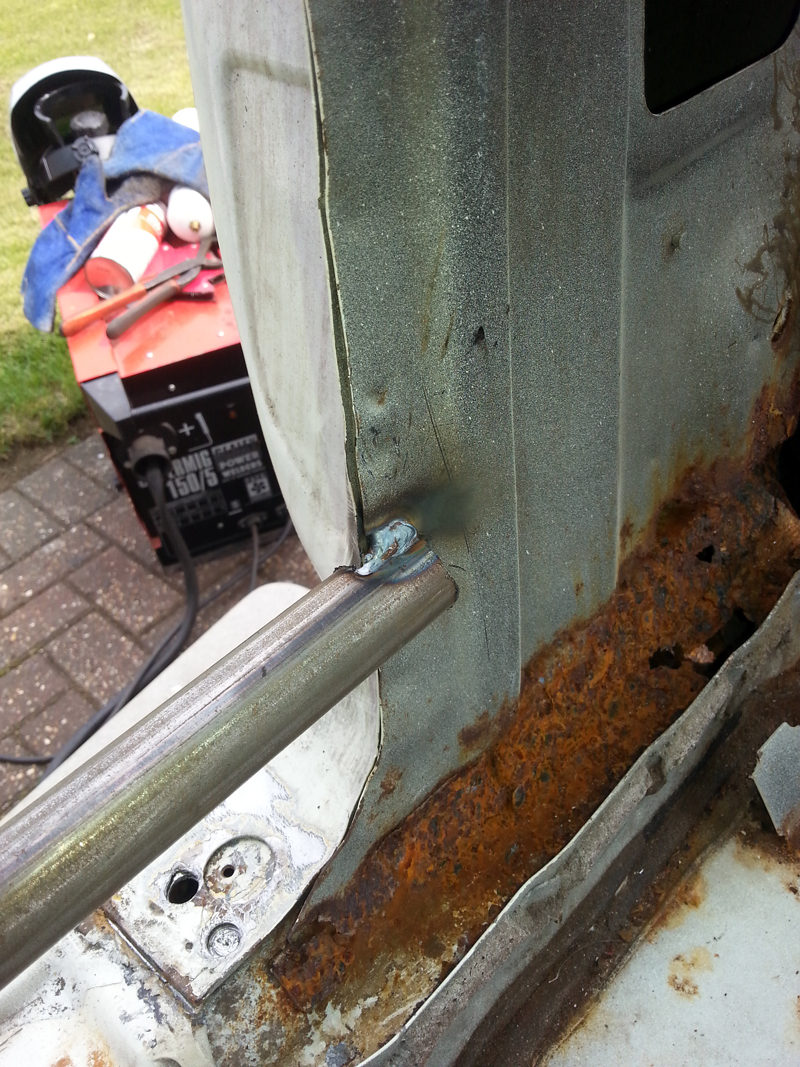
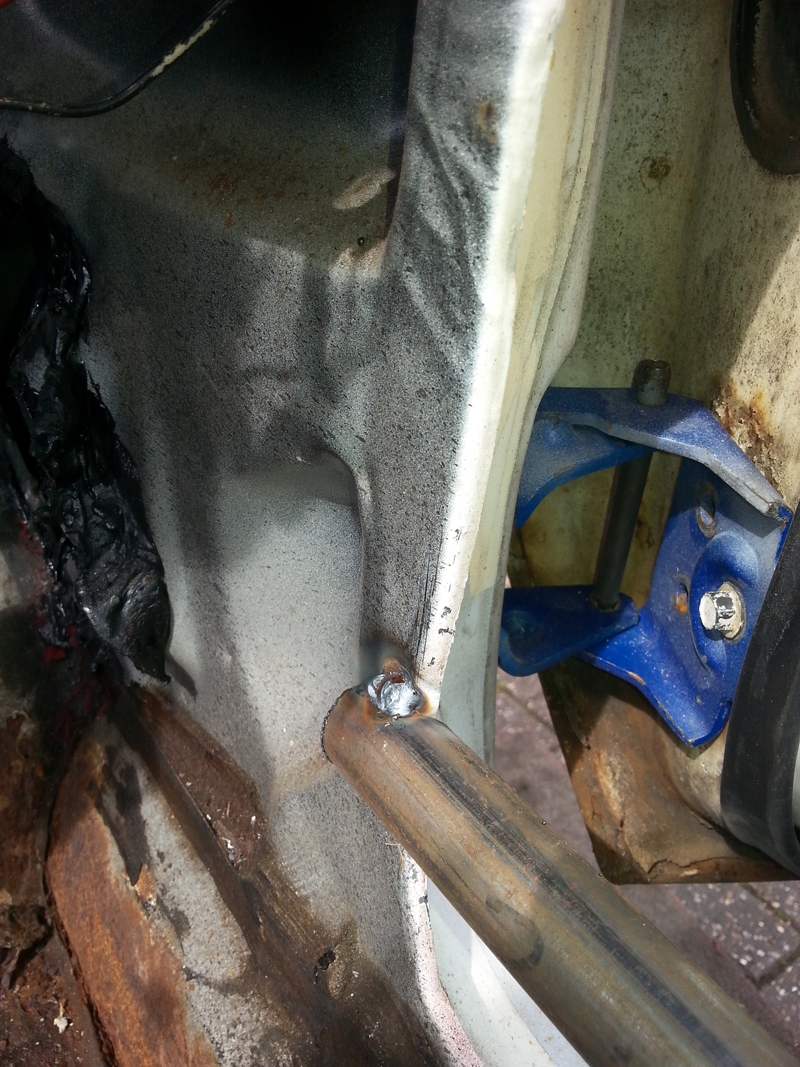
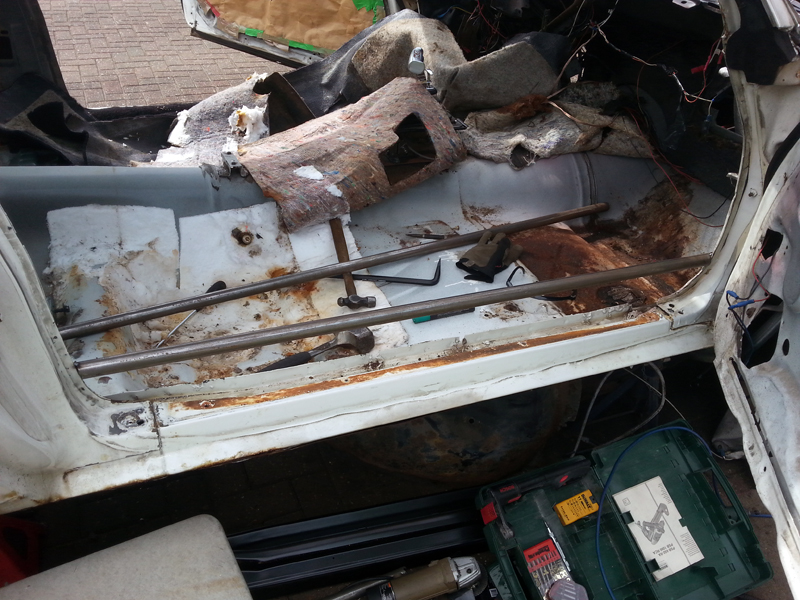
I then measured and cut another bar, to join the middle of the first bar to the trans tunnel, giving left to right support


I started with the most obvious and accessible spot welds next, top inner, where they join the inner rocker, starting from the middle and working outwards


I'm only about 12 welds in and I'm already fed up with them. I've broken 3 cutting heads, so may need to adjust my technique. I'm now drilling slower and applying less force, which seems to work, although the next 6 or so welds seemed to be bigger than the cutter, so I needed to use the chisel to break them fully. I found it quite disconcerting that each whack with the hammer was echoed by the sound of falling rust underneath.


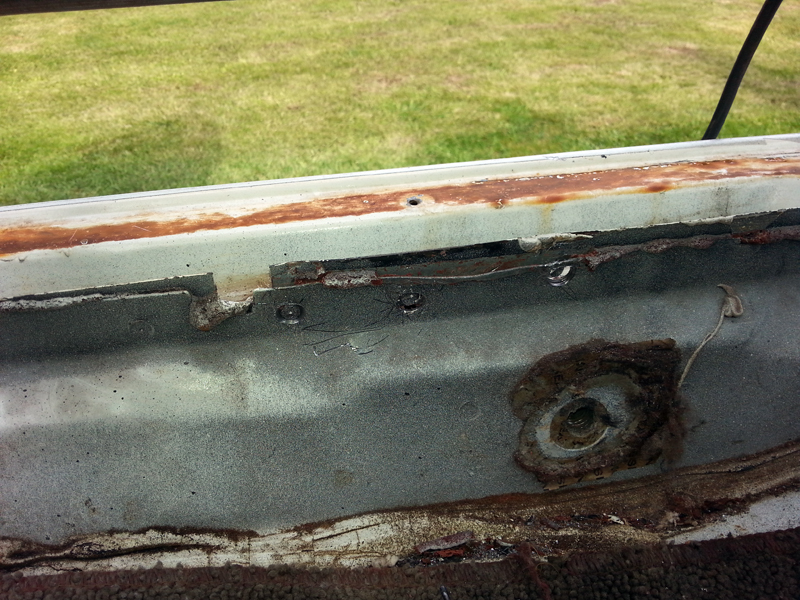
I didn't go all the way across the top, figuring it would be better to do these last, rather than having the top loose whilst working on the lower side. Instead I starter to work my way around the door jamb, where the welds are less uniformly spaced. I bit of wire wheeling and prising as each one is done and they aren't too difficult to find.


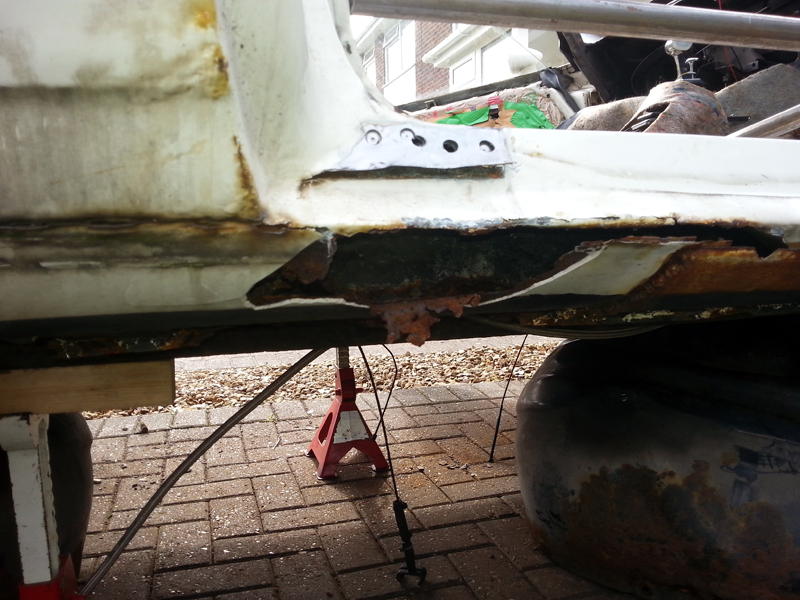
At this point I figured it might help to remove some of the outer panel, so give some better access and be able to see what was tied to what.


Warning - here follows some graphic images of a disturbing nature. Please don't read any further if you can't stand the sight of rust and filler.


The first bit pulled away quite easily


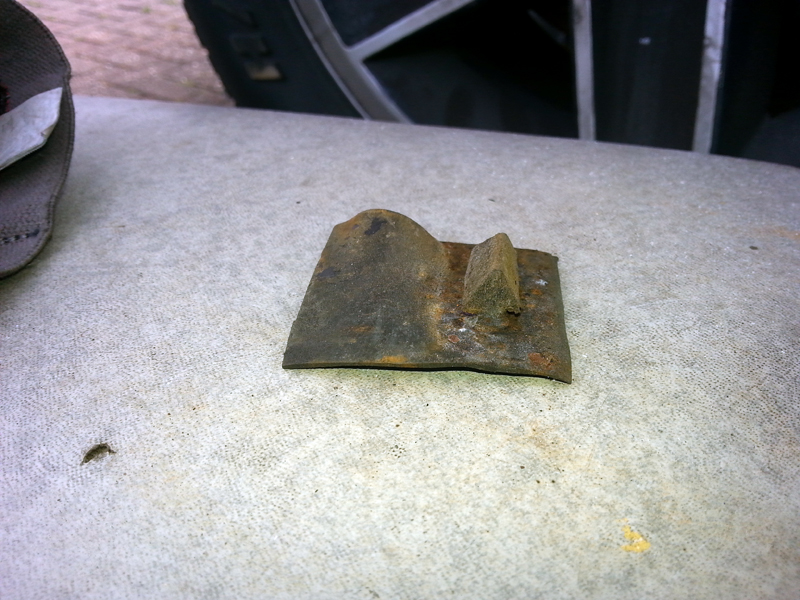
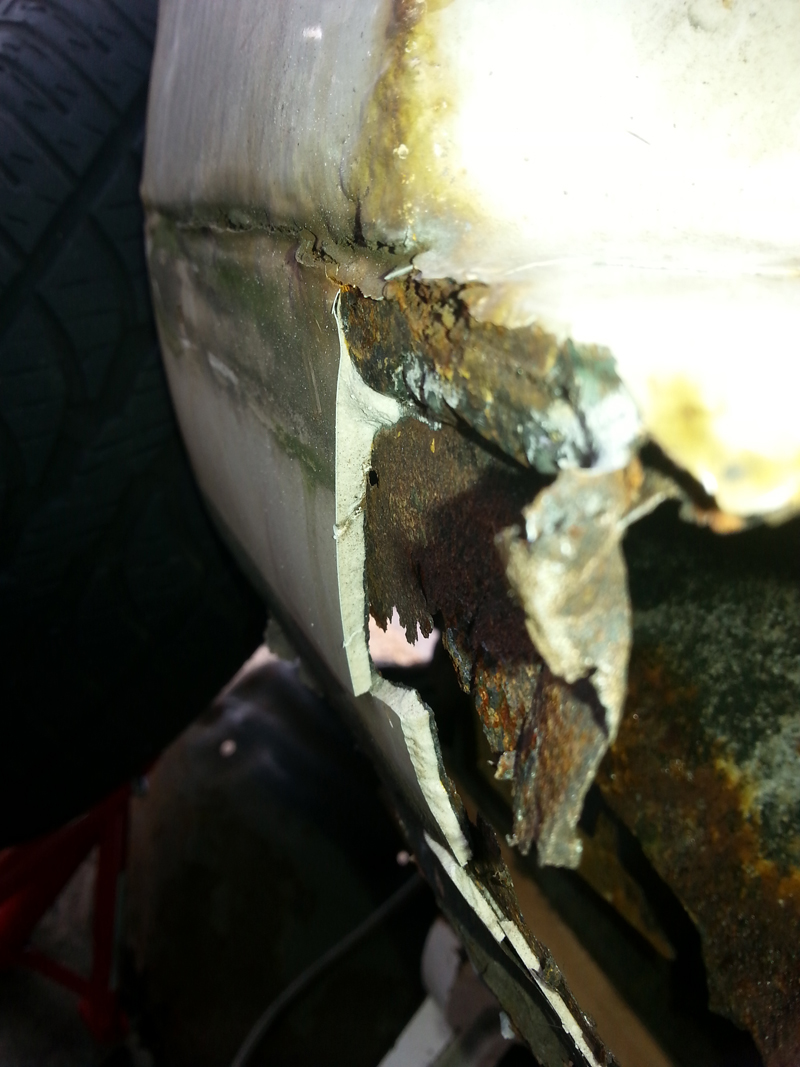
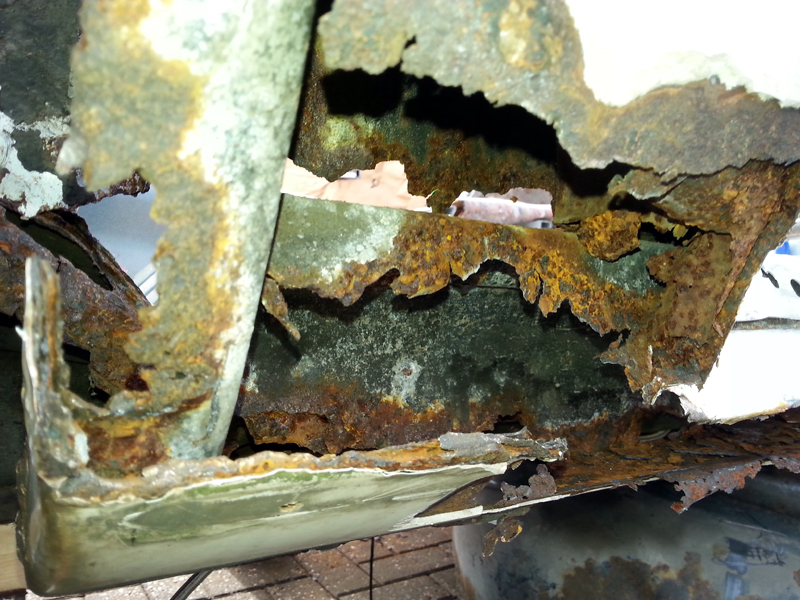
What's that lurking in there? Lets take a closer look.


I'm amazed, it's the rubber flap that fits into the inner rocker. Being as the hole is long gone, I thought this piece had too:


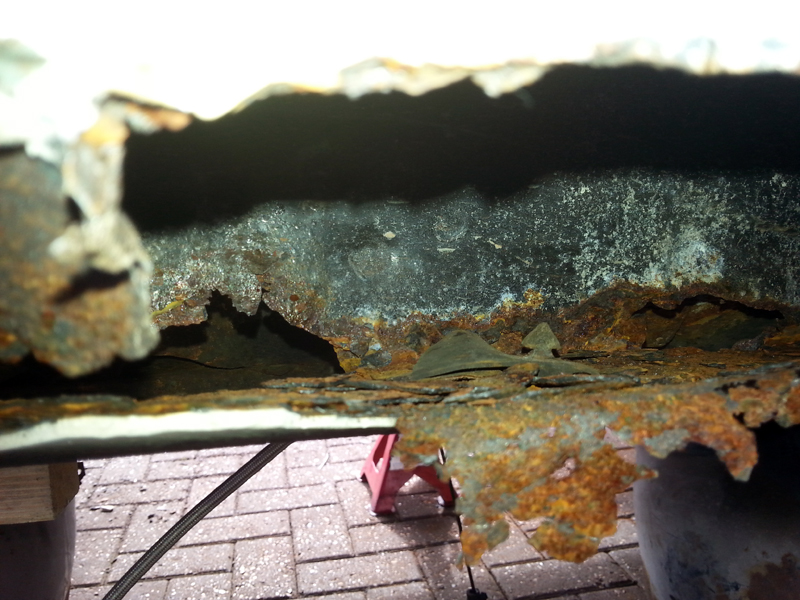
With a bit more pulling on the rocker, I found sheets of filler coming out. Looks like it's been put on quite thick


Kept on pulling it off, all the way to the back corner and then up onto the lower rear quarter


At this point I knew the quarter would have to come out to (I guess I always knew, but remained hopeful), so I grabbed the repair panel to check just how far up I could safely go

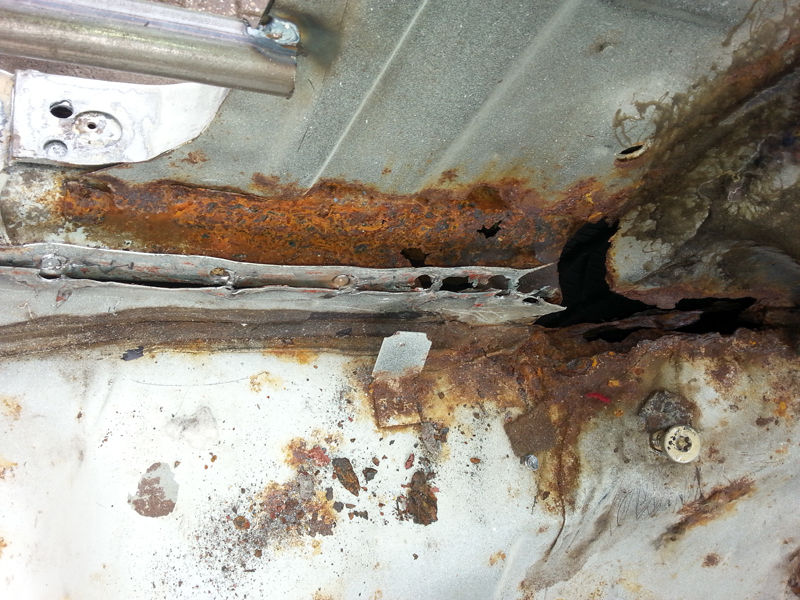
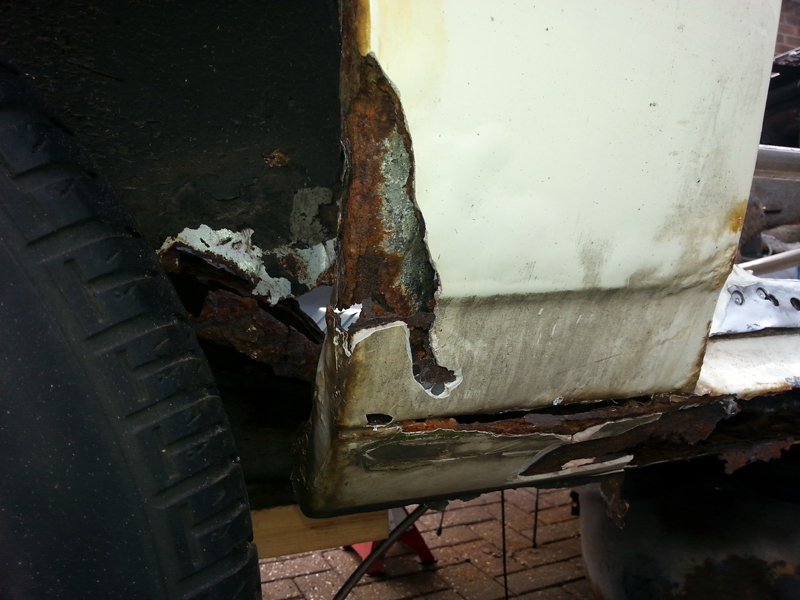
Some more digging shows the lower quarter is barely there


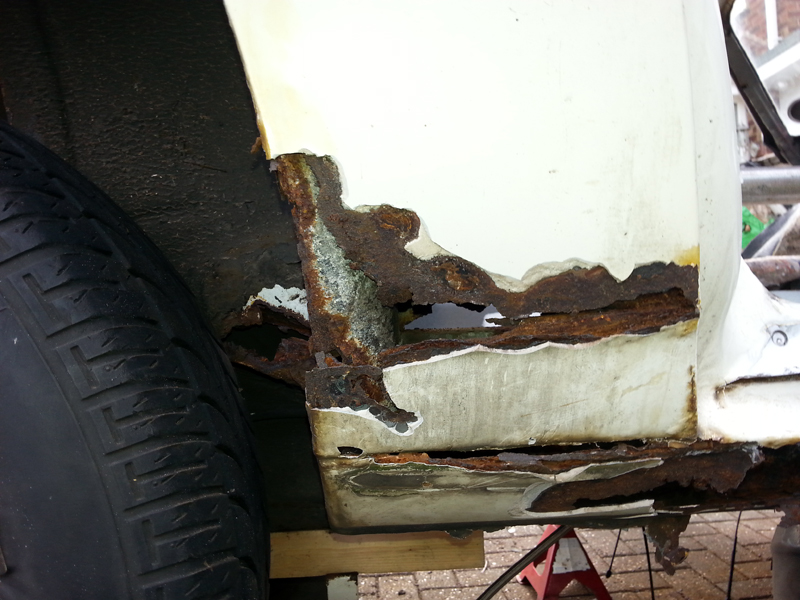
More and more digging and I've got the rocker free from the quarter and inner rocker at the rear. There are 2 spot welds at the very back of the rocker joining it to the outer wheelhouse, which I will tackle when I can move the wheel out of the way


Looks like there's lots to rebuild here


At this point I gave up for the day and clear up the huge pile of rust and filler from the floor.  The next job will be to tackle the spot welds on the underside of the rocker. Thankfully most of the rusty metal has already fallen out here and I'm back to reasonable metal.


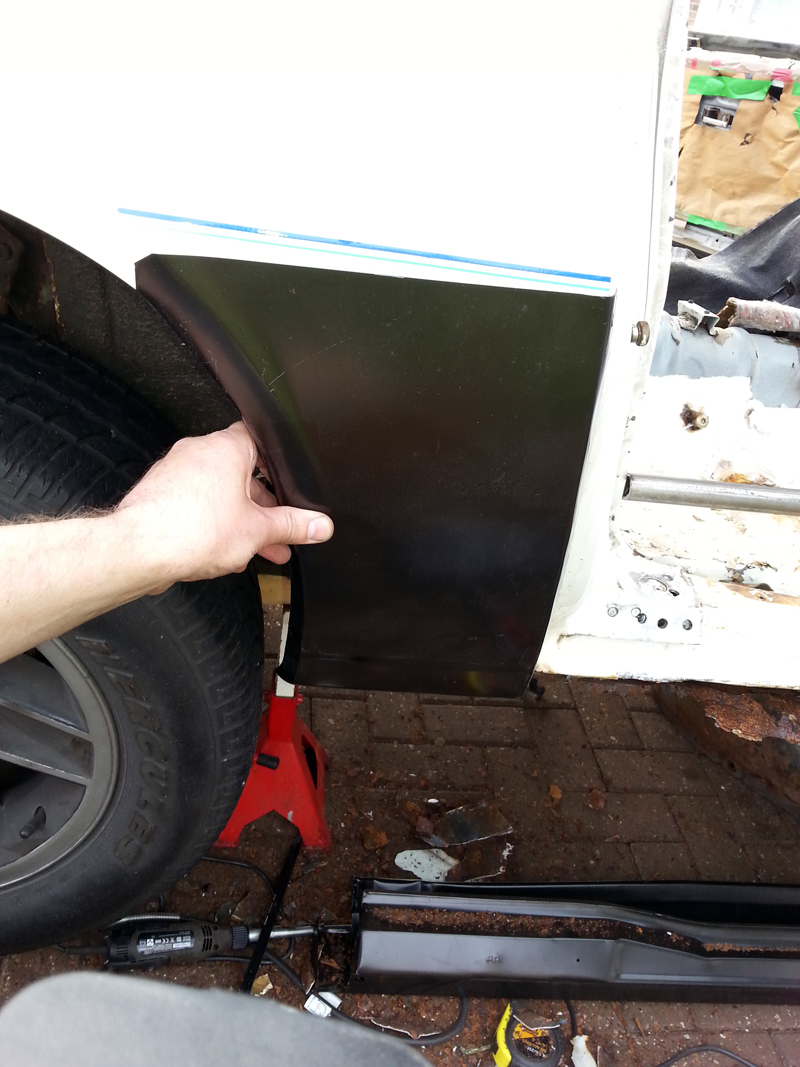
The downside of having so many parts from a car when it's stripped down, and not having any storage space left is that it has to go back in the car between jobs

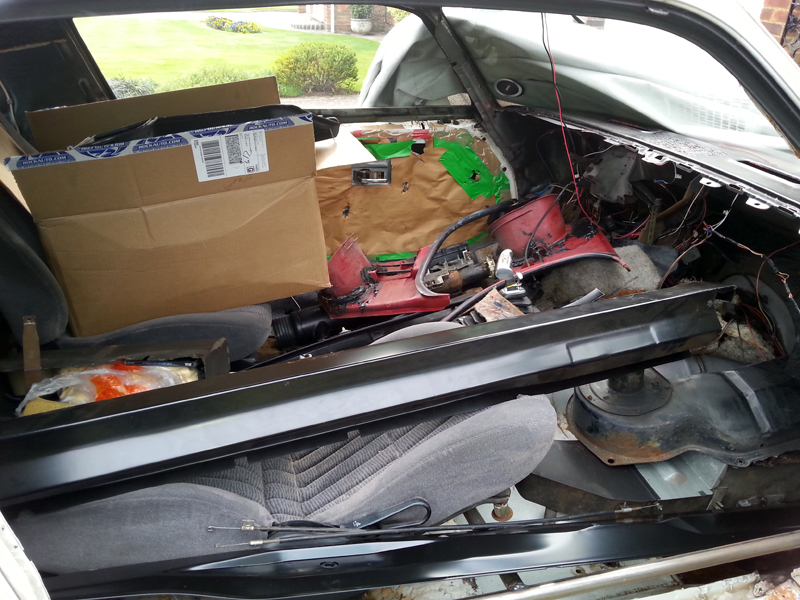
At least it won't take so long to remove it next time.

Jamieg285

  • Pimp
  • *
  • Posts: 7356
    • View Profile
    • http://www.mfatw.com/WD
'79 Camaro - Major surgery
« Reply #67 on: May 07, 2014, 08:12:30 pm »
I got a free hour today so continued on the removal of the outer rocker.

I'd planned to start on the lower joint, moving from rear to front.  Started by scrapping off some of the paint


I soon changed my mind though, as the metal here is badly corroded and it's not easy to see a seam to fit the chisel into.  Instead I moved to the front where the metal is good, and I can split it there and work backwards, splitting the rust apart when I get there.


Even this didn't go well, as I burnt through 3 cutting heads in quick succession, largely due to the spot welds being tight up against the body and it being difficult to get the drill on them straight.  I can't keep going through the cutters at this rate, so a change of plan is required. To start with, I've cut a big section of the rocker out to make some space, but I may also start to grind some of the welds out, especially where I know the panel on the other side will be replaced.  

Two long parallel cuts into the side of the rocker revealed a lot of crap accumulated inside


It also revealed a strange support piece, which I've not been able to find out what it is


I very nearly made a big mistake.  I knew there was a part of the front kick panel that extended into the rocker area, but I wasn't sure exactly where. Thankfully, the horizontal cut just missed it


The vertical cut wasn't so lucky, but I didn't cut too deep and can easily repair it later. There were a couple of spot welds that were on the underside of this bit, which you can see here, along with the slight cut to the front


With that out of the way, I started on the very end, to give me the ability to wiggle the panel as I work my way backwards


And that was it for today. Not much progress, but still progress.

Jamieg285

  • Pimp
  • *
  • Posts: 7356
    • View Profile
    • http://www.mfatw.com/WD
'79 Camaro - Major surgery
« Reply #68 on: May 19, 2014, 11:42:12 am »
Another good weekend on the car, mostly good but a couple of snags too.

Saturday was part car work, part travelling to get car parts.  In the morning I continued separating the rear end from the car, so that I could roll it back out of the way.  The rear brake hose put up a bit of a fight but did eventually come off cleany and the wheels were lowered to the ground.


Even this wasn't as smooth as I had planned as the drivers spring was still attached at the front and wasn't allowing the wheels to drop. The whole thing had shifted to the left and the shackle bolt that was still stuck to the spring was catching on the trunk drop off panel. Once I'd worked that out it was down but still not rolling. Another check around showed that I'd forgotten to remove the parking brake brackets where the cables route through the frame.  They were surprisingly difficult to get out, particularly the top bolt each side, but did eventually come out without any damage.


With that taking up more time than I had expected, I stopped for the morning and set out on the 2 hour journey to pick up the replacement frame rail I'd found.  The seller was a dealer in 2nd Gen Pontiac parts and regularly cuts up shells.  It was only a small yard, but proved to be a gold mine.  He'd only recently cut up a fairly decent shell (which is where the frame rail came from), so I asked about a couple of other bits.  Considering myself even luckier than usual, I picked up a drives side wire guard in decent condition and a section cut from under the rear seat on the drivers side, for just an extra £50 for the pair.  Considering that he'd already cut the floor pan randomly, it is almost exactly the right size to match the rusty sections I need to cut out. I've not checked in detail yet, but I think there would be less than an inch of extra metal, if any at all that will need adding manually.


Despite a lenghtly chin wag and another 2 hours on the road home, there was still time to do some more work on the car when I got home, so it was back to cutting the outer rocker off. With the trouble I was having with braking spot weld cutters, I changed tack and tried the spot weld drill bit that came in the kit.  This worked pretty well, doing a decent job of cutting and not snapping on me. The only downside is that it's slightly smaller in diameter, so required a bit more work with the chisel to seperate the pieces.

I worked my way from the front backwards, pulling the lower strip of metal outwards as I went.


About mid-way there were a couple of extra spots, not following the regular spacing of the rest. It transpired that these are where the seat brace fits on the other side of the floor pan.


It wasn't too long and the lower section was out.


There was a bit left at the back, which joined the outer wheel house. It was very rusty here and was flapping about too much to drill properly. Given the poor state of the wheel house, I knew I would have to patch it so I measure the distance from the door opening to the end, took a couple of reference shots and just ripped it out.


And that is enough for one day, quit while I'm ahead.

Jamieg285

  • Pimp
  • *
  • Posts: 7356
    • View Profile
    • http://www.mfatw.com/WD
'79 Camaro - Major surgery
« Reply #69 on: May 19, 2014, 12:22:16 pm »
Day 2 of the weekend didn't start off so well. I'd set myself the target of getting the rest of the rocker off. Having completed the lower edge, attention moved to the top-side and I immediately spotted a problem.  There was a line of spot welds that I couldn't drill without removing the door. I'm sure I took a picture, but I can't find it now.

So, unplanned, I removed the passenger door.  Removal wasn't all that bad. I carefully marked around the hinges, to be used to line things back up on re-fitting, and removed the glass for safety.  I pulled the hoist out of the garage and tied some rope through the holes in the frame and onto the hook on the hoist and took up the slack. Note, the rope I used streched a lot more than I expected and was probably too long for the job. When I do it again (and I will have to) I will allow a lot less slack.


I then removed the bolts from the door side of the hinges (which I came to realise was the wrong way to do it) and the door swung away (carefully guided as it went). It wanted to swing around and the outerside would hit the crane, so I carefully repositioned it the other way around so it was the inner side that would rest against the crane.


I then manoevered it to get a bench underneath and lay it flat, with the intention of sorting the bolts that snapped a couple of weeks ago.


After spraying inside and out liberaly with pentrating oil, I set about drilling them to use screw extractors.


This didn't go well at all. One is all but completely drilled out now and still isn't moving. I think I will end up having to drill it all and tap a new thread, or just leave it.  The other side didn't get that far, the extractor snapped, leaving the end in the bolt.  I don't think drilling will be an option there, so the next attempt will be trying to weld a nut on the end.  Either way, I wasn't happy and was aware that all of this was burning time and I needed to get a move on with the car, as the door would need to be refitted before the end of the day.

Back on the car, there were only 3 spots to cut out on the edge previously blocked by the door. I was expecting more, and wasn't sure if there were more, as the location made it difficult to get the chisel in and really break things loose.


With that done, it was back inside to do the rest of the holes on the top (Half of these were done previously).  Before doing this though, I removed the shifter, making things a bit more comfortable when drilling.


The top edge didn't take too long at all, but things still weren't moving as freely as I was expecting.  I scrapped off some more seam sealer and found a regular weld joining the inner and outer rockers:


Access was akward, but thankfully I new neither piece of metal here was going to be retained, so I simply sliced around it with the Dremel. With this gone I thought I was almost there, but there was still no more movement.  Out with the wire wheel, I found 3 small spot welds on the inner side, joining the outer rocker to the front kick panel.  A quick bit of drilling there and there was finally some movement.


All what was left now was a couple of small welds on the tab at the very end of the rocker (front) and one on the back edge.  With the front ones drilled out, the panel started to drop


It didn't drop any further, as there was one more hidden weld, behind the rear quarter to what I think is the door jamb brace. Whatever it was, it was rotten and was easily ripped out with a bit of tugging, which also broke the final spot at the back on the outer wheel house.  Finally, the outer rocker was fully removed.


All that was left for today was to tidy up - re-fit the door and put all the parts back inside the car.  

Re-fitting the door was nowhere near as easy as fitting, and could really have done with another pair of hands. I needed to be on one side of the door to operate the crane (for height adjustment) and then the other to fit the bolts.  It didn't go smoothly and I did catch/chip the front edge of the door in doing so. (at least I'm not too worried about the paint on the doors right now - that's another project for later). Getting the bolts to catch was one thing, then getting the door/hinge location right was another, and took ages. Again, and extra pair of hands here would have been invaluable.  I think next time, I will remove the hinges with the door, as refitting should be easier, and will also mean the door won't hit the hinges as it swings about.

With the door back on and adjusted (I missed an update somewhere - last week I went back to the hinges and adusted the door so that it fitted properly and didn't droop) I re-fitted to the glass, only to find that I'd got it wrong somewhere and the glass was stopping the door closing.  Referring back to the Window Alignment Guide http://www.nastyz28.com/forum/showthread.php?p=1442321  (I wonder which smart guy wrote that?) it didn't take long to fix, amending the stop heights and tilt on both the front and the rear. The door and window fit are now better than the've been in the whole 10 years of ownership, so at least I ended on a high.

Jamieg285

  • Pimp
  • *
  • Posts: 7356
    • View Profile
    • http://www.mfatw.com/WD
'79 Camaro - Major surgery
« Reply #70 on: May 20, 2014, 07:29:27 am »
Just a small update today.  With the outer rocker now out, it won't be long before the new one goes on and I wanted to have painted at least the inner face before I did so.

I've been looking at lots of options for the right paint for this and the rest of the car. Based on lots of recommendations for epoxy primer I knew I wanted that, but I don't have any spraying capabilities, so it had to be brushable. I opted for the most suitable that I could find over here in the UK, which was Jotun's Jotamastic 87. Designed for marine use, it has high corrosion protection and doesn't need perfect preparation - it can even be applied when it's raining!

It's a 2 part epoxy and comes in a 5 litre tin. It only has 1 hour usage after mixing, so I had to make up just a small amount.  I scuffed the inner face of the outer rocker, and also the same in the inner rocker, in case there was any paint left over.


I've not used this type of thing before and didn't make the best job of decanting some into a measuring pot, but did end up with something I could use. It brushed on quite well, but was easy to leave thin patches. I think I started painting a bit early as it seemed very thin at first but thickened up and was easier to use as I went on.  It turns out a little goes a long way, and I had mixed too much. Both panels were given a generous first coating and I still had half of what I had mixed left over.  I think in future I will try to have more things prepared in case there is paint left to use, and make it up in smaller quantities.

Roadkill

  • Guest
'79 Camaro - Major surgery
« Reply #71 on: May 20, 2014, 02:10:11 pm »
Quoting: Jamieg285
Jotun's Jotamastic 87


Mentally noted.

Jamieg285

  • Pimp
  • *
  • Posts: 7356
    • View Profile
    • http://www.mfatw.com/WD
'79 Camaro - Major surgery
« Reply #72 on: May 21, 2014, 07:41:56 am »
As the evenings get longer and the weather better, I get more chance of a short session in the evening after work. Yesterday I decided to take a closer look at the rust at the bottom of the rear quarter and establish just how much was rotten.

I hit it with a disc sander, and learnt that these don't like edges, especially rusty ones and ruined 2 discs very quickly.  I was however quite suprised that the rust wasn't too bad (on the outside at least, I still need to look inside).


Looking in the wheel well, the rust at bottom of the outerwheel house extends a bit further up, but there is some good metal there, so patching should be fairly simple.


Now the fun bit, I offered up the rocker for a trial fit.


Given that I didn't put in much effort to line things up yet, I think it looks pretty good. The inner lip appears to be higher than the old one, but I will look at that more closely in the next session (hopefully later today), where I plan to get it lined up and put some screws in to hold it in place until I'm ready for welding.

Roadkill

  • Guest
'79 Camaro - Major surgery
« Reply #73 on: May 21, 2014, 08:30:00 am »
Quoting: Jamieg285
I hit it with a disc sander, and learnt that these don't like edges


DA's work better on edges, I find, although tend to be less aggressive.

I'd recommend a 3M "strip n clean" wheel . . . they're pretty cheap on eBay and take off EVERYTHING, leaving only good metal behind.

I used the purple ones on the Camaro, after my brother recommended them to me . . . probably the best thing he's ever done for me !

Jamieg285

  • Pimp
  • *
  • Posts: 7356
    • View Profile
    • http://www.mfatw.com/WD
'79 Camaro - Major surgery
« Reply #74 on: May 22, 2014, 12:20:09 pm »
Quoting: Roadkill
I'd recommend a 3M "strip n clean" wheel


Rolocs.

I've seen them recommended in the US, didn't know you could get them over here.  I've ordered one and will see how it goes.

How resilient are they, is one likely to last or will I need more?